
Meetings
- Board Vault: Access Board documents for the upcoming Meetings on your Mobile Phone or Tab – both Android and iOS, organized into different meeting categories – Board Meetings, Sub-committee Meetings and General Meetings
- Annotations: Provision for Directors and Invitees to highlight and comment. The comments can be saved as personal notes or can be shared with the secretarial team
- Meeting records of previous meetings: Access records for the meetings held in last one year
- Voting: Voting on Circular Resolutions using the App and keeping the track of the votes cast on such Circular Resolutions.
- Calendar of the Meetings: A ready calendar that highlights all the Meetings, scheduled, and proposed, with ability to access the records by clicking on the Calendar. Get notifications on the App when a Meeting Document is available for review.
- Confirm availability for the Meeting scheduled: Confirm their availability for the scheduled meeting through the app and it sends intimation of the same to the secretarial team.
- Offline Mode: Provides seamless experience in reading the Board documents even when there is low connectivity or no connectivity.
Please note: Companies will have to subscribe to BLISSDOCS app to enable their directors and invitees to see the Agenda and Minutes for board and sub-committee meetings in BLISSPLUS/BLISSLISTED.
- Go to your meeting record as available in Records Page
- Click ‘Agenda Annotations’ button to open the meeting agenda. Annexures attached to the agenda will also be available in the same screen
- Select the session timeout duration and click ‘Extend’.
- Login to BLISS and go to your company
- Click on ‘Company Data’ button
- Go to ‘E-repository’ tab available under Company Data
- Click on ‘AGM Notice’ Template to download the same
Please call us or email at support@cimplyfive.com for any assistance required to use this feature.
BLISSDOCS enables companies to conduct paperless Board Meetings as they provide their Directors access to Board Docket on their smart phones or tabs. Further, where internet connections do not exist or the signal is weak, the Directors can switch their BLISSDOCS app to offline mode. This helps Directors to have seamless experience in reading the Board documents even when there is low connectivity or no connectivity. BLISSDOCS enables companies to conduct paperless Board Meetings as they provide their Directors access to Board Docket on their smart phones or tabs. Further, where internet connections do not exist or the signal is weak, the Directors can switch their BLISSDOCS app to offline mode. This helps Directors to have seamless experience in reading the Board documents even when there is low connectivity or no connectivity.
Any user with admin rights in BLISS can provide BLISSDOCS access to their Directors and can define the period and the committees for which the particular Director will have access, thereby customizing it for their Sub-committee memberships.
BLISSDOCS provides Directors the following features:
- Board Vault: Access Board documents for the upcoming Meetings on your Mobile Phone or Tab – both Android and iOS, organized into different meeting categories – Board Meetings, Sub-committee Meetings and General Meetings, with provision to highlight and comment and share them using the BLISSDOCS App.
- Meeting records of previous meetings: Access records for the meetings held in last one year
- Voting: Voting on Circular Resolutions using the App and keeping the track of the votes cast on such Circular Resolutions.
- Calendar of the Meetings: A ready calendar that highlights all the Meetings, scheduled and proposed, with ability to access the records by clicking on the Calendar. Get notifications on the App when a Meeting Document is available for review.
- Confirm availability for the Meeting scheduled: Confirm your availability for the scheduled meeting through the app and it sends intimation of the same to the secretarial team.
Please note: Companies will have to subscribe to BLISSDOCS app to enable their directors to see the Agenda and Minutes for board and sub-committee meetings in BLISSPLUS/BLISSLISTED.
- Prepare your Meeting Agenda/Minutes using BLISS
- Go to the particular agenda item for which you wish to create and delegate the task to some other user
- Click ‘New Action tracker’ icon and update the Action details
- Select the user to whom you wish to assign the task. For others, update the Name and Email id
- Update the due date and comments if, any
- Click ‘Submit’
- The user to whom the task is assigned, will get a mail intimation for the assigned task.
- Once the agenda of the meeting is finalised, pending actions get triggered under Action Trackers Tab as Event based Actions
BLISS provides a provision to the Secretarial team to send the Agenda Notice e-mails for the upcoming meeting along with Calendar Invite enabling the directors and invitees for the meeting to add the event to their personal calendar and be reminded of the meeting based on their reminder status set. This feature allows the directors and invitees to plan and ensure participation in the meeting.
The calendar invite can be sent only after the Agenda is finalized.
Steps to send agenda mails along with Calendar Invite
- Go to Records page of your company
- Select the meeting for which you wish to email the agenda along with Calendar Invite
- Open the agenda and select the agenda file type option to be emailed – pdf or word
- Click ‘Email’ button
- Select email ids of the directors and invitees to whom you wish to send the mail. If your Register of Directors & KMP is updated in BLISS, click the Directors checkbox to get prefilled email ids of all the Directors. Otherwise please add e-mail id of the Directors.
- Tick ‘Include Calendar Invite’ checkbox if you wish to add calendar invite for the meeting
- Confirm the date and time for which calendar is to be created and click ‘Include’ button
- Click ‘Send’ button to send the email.
Please note, if you are sending the same Agenda notice once again to other invitees not included in the first e-mail, please mark all the original invitees for the meeting to ensure the original invite remains intact.
If the original invitees are not marked in the subsequent e-mail, the original invite will get cancelled as a new meeting is been created excluding the original invitees.
BLISS provides a provision where users can add customized sub-committees as per their requirement, by defining the number of meetings for that sub-committee, the quorum required for these meetings including specifying the number of Independent Directors who need to be present, setting reminder emails for conveying the committee meetings.
Further, the user can add any number of sub-committees to their company as required by them.
Steps to add User defined Sub-committees
- In Company Data, go to Sub-committee tab
- Click Add button to add new sub-committee
- Fill in all the details required, such as:
- Sub-committee Name
- Last meeting S.No. to track serial numbers of subsequent meetings
- Select Members of the Committee from the list of Directors as available in Register of Directors and KMP updated in BLISS
- No. of Minimum Directors and Independent Directors for the purpose of Quorum
- No. of Meetings and Select the Quarter in which it is to be done in order to trigger the dashboard and due date reminder alerts
- Duration Start the date from which the sub-committee meeting needs to be conveyed and Duration End -the date up to which the sub-committee meeting needs to be conducted.
- Click Save button to save the details
4. Click Edit button to edit existing sub-committees and click Save button to save the details
With BLISSPLUS, you can create Directors as users. Once created as users, the Directors can indicate their availability for a scheduled meeting, view the complete Board Docket or view each attachment separately and get venue directions for the meeting. With this feature, Directors can plan their calendar, have board docket at their fingertips thereby enhancing their productivity.
How to provide Directors access to BLISSPLUS?
- In Company Data, go to User Rights
- Click ‘Add User’ link and update First Name, Last Name, Email Id and select the role as ‘Director’
- You will have the option of customising the Directors view of the company records. Based on the needs of the Director you can provide them access to Agenda, Minutes, Registers and Returns as is mutually agreed. Choose the desired settings and click ‘Submit’
Please Note: The Directors need to open the link they receive in their email inbox and click on the link given to set their own password and access Company Records in BLISSPLUS.
Features available to the Director as a user:
- Dashboard– To track compliance status of the Company
- Scheduler– To view calendar of proposed and scheduled meetings
- Records– View Company records of agenda, minutes, registers and returns. In addition, check their availability status for a scheduled meeting and get venue directions
- Past Records-To view Company’s previous years’ record
- E-repository– To view Company’s important documents like Memorandum of Association and Articles of Association
- MCA Data– To view Company Profile as available on MCA website
- Financial Information-To view company’s capital structure and financial information
- Action Trackers– To view pending actions
- Other Compliances– To monitor list of applicable compliances
BLISS provides the user with an option to e-mail Directors to get their availability by Board Meetings by giving them the proposed agenda and meeting date and time at a click of a button. This feature will help the Directors to plan their availability for the meetings and enhance their productivity.
How to send Board Meeting alerts to schedule meetings?
- In ‘Company Data’, go to ‘Meeting Scheduler’
- In the Meeting Scheduler, select the meeting type, quarter, date and the proposed agenda
- Select the meeting for which you wish to send email to Directors for ascertaining their availability
- Click on ‘mail icon’ and enter the email ids of the individuals to whom you wish to send the alert
- Click ‘send’ button to send the mail alert. Please note the mail icon will turn light blue.
- To access the mail sent, click on the mail icon, which has turned blue in the Meeting Scheduler
Agenda/Minutes
- Go to Records page and identify the meeting in which the agenda you want to replicate.
- Click on that meeting and click ‘Replicate’ button
- Select the Company in which you wish to replicate the same agenda and click ‘Replicate’
- A draft agenda with same agenda items will be created in the selected company’s Records page
- Save the agenda and update meeting details.
- Go to Records page and identify the meeting in which the agenda you want to replicate is there.
- Open the agenda of the selected meeting and verify the agenda items to be replicated to a new agenda
- Click the ‘Replicate’ button available in agenda module
- A draft agenda with same agenda items will be created in the selected company’s Records page
- Save the agenda and update meeting details.
BLISS enables users to create and circulate the AGM Notice that is complete in all respects. You can download a comprehensive notice that contains:
- Notes to the Agenda notice
- Explanatory Statement for Special Business
- Admission Slip for shareholders
- Proxy Form for shareholders
- Route map for the meeting venue, and
- Where needed, generate shorter notice consent letters from shareholders
BLISS contains 50+ pre-populated resolutions for Shareholders’ Meetings with curated but editable resolutions for Ordinary and Special Business.
This reduces the time and effort in drafting the agenda and other documents while ensuring that nothing critical is missed out from a compliance perspective.
Steps to create Shareholders Meeting Agenda
- Go to Agenda, select the Annual General Meeting
- Ready to use Agenda templates with Pre-Populated Ordinary Business Agenda items will be available
- Add any further resolutions required from the pre-drafted repository using the Search option by entering the key words
- Select the agenda item and drag and drop it to the center of the screen
- Place it as per desired serial order through move item toggle
- Update the required details for all agenda items or make changes as required
- Save the agenda and update meeting details.
Further, the document layout/formatting is customizable for Notice and Shorter Notice consent for BLISS LISTED/BLISSPLUS users
Note: Prefilled shorter notice consent letters can be generated if details of all the members are updated in Register of Members in BLISS.
Our team is available to assist you in creating this template for your use anytime after you subscribe to BLISS and users can also refer the available ‘sample template’ and token dictionary to create their own template
- Select document type as Agenda and select the type of meeting
- Click Add button
- You can select the date for activating the Templates
- Choose the file and click ‘Upload’ button
- Select document type as Minutes and select the type of meeting
- Click Add button
- You can select the date for activating the Templates
- Choose the file and click ‘Upload’ button
- Select document type as Circular Resolution- Board Meeting or Sub-committee Meeting (For Sub-committee Circular Resolution select the type of committee).
- Click Add button
- You can select the date for activating the Templates
- Choose the file and click ‘Upload’ button
BLISS enables users to create one-time standard e-mail content for repeated use in emailing Agenda, draft Minutes and final Minutes for circulating it to the Directors for all types of meetings i.e., Board, Sub-Committee and Shareholder meetings. This feature helps the users to avoid the clerical errors, as the email picks up the current meeting date, venue and serial number of the meeting based on pre-programmed feature in the software.
How to create E-Mail template?
1. E-Mail templates can be created under Email Template tab under Company Data and can be saved for all the future meetings.
2. Users can use tokens for meeting date, Venue and Serial number of the meeting in the template to automatically pick up data for the current meeting and avoid clerical errors in the mail sent to Directors.
3. Users with Subscriber, Admin, Editor and Drafter can edit and create email templates.
BLISS enables users to track leakage of sensitive documents by Including watermarks in document templates. The data downloaded or printed by the users will have watermark displaying the email id of the user, along with the date and time of download. This will help the company to deter misuse of data or track any leakage of the confidential data that is stored in BLISS for unauthorized purpose.
This can be used for both Agenda, Minutes and Circular resolutions of the Company.
What token to be used and where?
1. |watermark{text(Private and Confidential),date(dd/MMMM/yyyy hh:mm a)}|
2. At the end of the document template.
- Make sure the agenda is created using BLISS and is in finalised state
- Go to records page and select the particular meeting
- Click ‘Agenda’ tab to navigate to the Agenda Module
- Add the required agenda items and click ‘Mark as Supplementary Agenda’ icon for the supplementary agenda items and select the date and time for ‘Supplementary Agenda Item’
- Users can also mark any of the attachment/s to an existing agenda item as ‘Supplementary attachment’ after uploading the file and selecting the date and time of inclusion.
Please Note: This function will be available only when-
- User defined template is used for the agenda and the token variation for the same is added in the template
- Board/Committee Meeting agenda, as the case may be, is finalised
- Maintain all the prior versions of draft agenda/ minutes circulated within the team for inputs before finalizing the agenda/ minutes.
- Record of email for the notice, agenda and minutes sent to Directors and KMP.
- List of email prompts for Directors of the Board, Sub-committee members, equity, and preference shareholders for shareholders meetings. BLISS will also prompt Mail ID based on previous mails sent to Auditors or other invitees.
- Ensures that the sender does not inadvertently send the email to users who are not entitled to receive the email.
- Store proof of having circulated agenda, draft minutes, and final minutes in BLISS.
- Provide access to different versions of drafts and the final document created.
- Facilitates the Secretarial Team to easily share large Meeting documents and enables quick download of it by Directors and Invitees to the meeting.
- Provision to add calendar invite while emailing the meeting agenda.
- Email the circular resolution to all the Directors/ Members of the sub-committees and keep track of the mails along with the proof of delivery.
BLISS has the provision for users to group Multiple Agenda Items together for more efficient Board Meetings. Users can group items under -For Board’s Noting, For Board’s Information, For Board’s Decision making, etc. This could enable optimum time allocation for efficient Board Meetings.
Key Features:
- Grouping of agenda items makes the Meeting Agenda and Minutes more structured and better presented for efficient meetings.
- Club multiple agenda items of same nature together thereby presenting a more coherent agenda to the Board.
- Option to create sub-groups within the main group.
- Ease of rearranging agenda items within same group or from one group to another. Rearranged sequence can be moved to Agenda Module by clicking ‘Agenda Sequence’ button.
- Provision to group a select set of agenda items of the agenda and minutes and option to choose to display or not to display the group name and description in the downloaded agenda and minutes.
- Provision to replicate groups created from Agenda to Minutes.
Please Note: This feature works only if user defined template is uploaded for agenda/minutes.
- Upload attachments (up to 30 pdf files of 10 mb each) with every agenda item in Agenda, Minutes and Circular Resolutions related to specific agenda item
- Provision to shuffle the order of uploaded attachments by dragging the attachment file to a desired position without requiring the users to delete and re-upload
- Option to take print of Board Meeting/ Committee Meeting Agenda with inline attachments
- Upload and store other signed documents related to the meeting.
- Upload presentation
- Retrieve uploaded documents easily with ‘Search’ feature or go to records page and select the particular meeting to access the records uploaded
- View these documents without downloading the file either in pdf or word format after every edit
- Refresh the already opened annotation page to view the changes/ edits made in the document
- Secretarial team can view the final version as it would appear to Director and Invitees.
- Annotations done by Directors to any of these documents will be available in the creation page itself in addition to the view from the Records page
- Select your Meeting Agenda from the options available in BLISS
- To add new agenda items as required, move to the pre-drafted repository available on the left side of your screen
- Search the required agenda item using the Search option by entering the key words or add a customised agenda item
- Select the agenda item and click the arrow to add the same
- Enter the sequence number where you want the agenda item placed and click ‘set’ button
- The new agenda item will be positioned in the selected sequence number
- Upload attachments and annexures related to a specific agenda item.
- Upload multiple files relating to a particular agenda item in a single click. Upto 30 pdf files can be attached per agenda item (PDF file of max. size 10 MB).
- For all the agenda items with supporting documents, users can mark if the annexures are uploaded along with the document or it will be tabled at meeting. BLISS caution the users, when they miss to upload any attachment/annexure for a particular Agenda Item for which they have selected “Attached as Annexure.”
- Option to take print of Board Meeting/ Committee Meeting Agenda with inline attachments.
- Upload and store multiple annexures, any meeting related documents, approved and signed meeting agenda and minutes for records, etc. (Support all type of documents).
- Upload board presentation, if any
- Retrieve uploaded documents easily with ‘Search’ feature or go to records page and select the particular meeting to access all the related records uploaded.
- Prepare your meeting agenda using BLISS
- Save it and update the Meeting Details for date, time, and venue for the meeting
- Identify the items that you do not wish to share with the specific users
- Click ‘Restrict Agenda Item’ button and select the Users who can view the restricted agenda item
- Click ‘Pdf’ or ‘word’ icon to download/ email the agenda with specific items
- Select the items you wish to download/ email
- Click ‘email’ button to email the agenda and click ‘print’ button to download the agenda.
- Prepare your meeting agenda using BLISS
- Save and update the meeting details
- Go to the sensitive/confidential agenda item for which you wish to restrict the view for select users
- Select the Directors/ Committee Members/ Invitees who who can view the agenda item
- Click ‘Submit’ button to save.
This restricted view is enabled for the select user when they log into BLISSPLUS or BLISSLISTED and BLISSDOCS, our paperless Board app.
- In Company Data, go to ‘Manage Templates’ tab to access all the uploaded templates
- Go to ‘Search Filter’ and select document type, meeting type and sub-meeting type
- To modify any existing template, click edit button. Download the existing template, make the necessary changes and upload the revised template
- To delete any existing template, click ‘delete’ button
- For date-based templates, search particular template, click edit button and update ‘Active to’ date and add a new template for the current period. For eg. Change in registered office address effective from a specific date.
- Agenda Pre-populated with all the mandated items -based on Companies Act, 2013 and Secretarial Standards for unlisted companies and LODR for listed companies.
- Add a customised agenda item to the prepopulated items
- Provision to place the attachments inline, i.e. after each agenda item or to have all the annexures placed at the end of the agenda document
- Create and assign task related to any agenda item to other users
- Grouping of multiple agenda items of same nature together like statutory items, Accounts & Audit related items, Business Issues etc.
- Customise the look and feel of the document using user-defined agenda template confirming to users’ style guide
- View agenda in preview mode to mark any comments, to track changes done by other users or create multiple versions of the agenda
- Download the document in a pdf or word.
- User can also use the word download to make changes to the agenda and the final word doc can be uploaded back to BLISS using Word Import feature to restore all the changes
- Replicate the same agenda to other companies in the group or to the same company
- Upload Signed Documents and Meeting Presentations for each meeting
- Get triggers for all the compliances on finalising the agenda with regard to related registers, returns or other actions
- Circulate the meeting agenda to the Directors using BLISS email function along with a calendar invite
- Provision to mark annotations for the recipient of the agenda. The annotation view of agenda can also be used to present the agenda during the meeting.
- The templates for Board and Subcommittee agenda and minutes can be defined in a template to match the users style guide.
- Provision to add hyperlinked Table of Contents enabling easy navigation for Directors between the agenda items.
- User defined fields for inserting Snippets to the Agenda Title, Actions required for a specific agenda item, attachment details (File name) and page numbers can also be customized and added to the Agenda Index.
- The user can use different templates for different periods, as defined by them
- At the users’ choice, attachments can be placed after each agenda item or at the end of the documents.
- Login to BLISS and click on the desired Company
- Go to ‘Manage Templates’ tab available under ‘Company Data’
- Click ‘Add’ button and select document type, meeting type and sub-meeting type, if any (In case the template is same for all sub-meetings, leave sub-meeting type as blank)
- Define the period for the template by updating ‘Active From’ and ‘Active To’ date. For the current period, leave ‘Active To’ date field as blank
- Click ‘Choose file’ button to select the template
- Click ‘Upload’ button
Steps to search/modify uploaded templates
- Go to ‘Manage Templates’ tab available under ‘Company Data’
- Under Search Filters, select the document type, meeting type and sub-meeting type if any
- All the existing templates based on the search will appear
- Select the template you wish to modify and click ‘edit’ button
- Make the required changes and click ‘Update’ button
Please note: All the existing templates are moved to Manage Templates module under Company Data, which now provides more controls.
- In Company Data, go to User Rights
- Click ‘Add User’ button and update first name, last name and email ID of the new user
- Under Role, select ‘Director’
- Select the required filters for the type of records the Director is given access to
- Select the period for which records can be viewed by that user and whether the user has access to draft documents too.
- Set access validity end date and click ‘Submit’.
Go to the Sub-committee meeting agenda, where the User added as a Director of the Company is an invitee in the respective committee meeting. Update the details and email id of such Director as an invitee under Agenda Meeting Details.
- In Company Data, go to User Rights
- Click ‘Add User’ button and update first name, last name and email ID of the new user
- Under Role, select ‘Invitee’
- Select the required filters for the type of records the Invitee should be allowed to access
- Select the period for which records can be viewed by that user and select among drafts and final documents
- Set access validity end date and click ‘Submit’.
Go to sub-committee tab under Company Data and add name and email id of such user as a member of the respective sub-committee.
- In Company Data, go to User Rights
- Click ‘Add User’ button and update first name, last name and email ID of the new user
- Under Role, select ‘Invitee’
- Select the required filters for the type of records new user should be allowed to access
- Select the period for which records can be viewed by the Invitee
- Set access validity end date and click ‘Submit’.
Make sure details of the Invitee along with his/her mail id must be added in the meeting details of the respective meeting and the mail id entered in User Rights page should match with the mail id entered in the Meeting Details.
- Prepare your meeting agenda using BLISS
- Save the agenda and click ‘Meeting Details’ button
- Update the meeting details with regard to date, time and venue of the meeting
- Scroll down to Directors/Members of the Committee/Invitees details
- Drag and drop to re-arrange the order as desired
- Selected order will appear in the minutes and attendance sheet of the meeting
- Go to Records Page
- Click on the required financial year
- Scroll to the required meeting category
- Go to the specified meeting row for which signed agenda/minutes is to be viewed
- Click Agenda-View/ Minutes-View under the Signed Documents column to access the list of signed documents uploaded by the Secretarial Team
- Click on the document to view the same
Please note: Only PDF files can be uploaded in Signed Document folders. If any files are already uploaded in Signed Documents folder, those will be available under Agenda section.
MS Word file import facility for Agenda and Minutes
BLISS has released a new significant feature on June 8th by which Agenda and Minutes can be downloaded in MS Word file format from BLISS for subsequent edits and modifications. This feature will help the secretarial team to update BLISS with the final version of the Agenda and Minutes files once the content is approved by all concerned. Users can also utilize Word’s advanced editing features with this provision.
Steps to import edited MS Word file of agenda/minutes in BLISS
- Prepare your agenda/minutes using BLISS.
- Save the agenda and update meeting details
- Click ‘Download as doc’ button to download the draft agenda in MS Word file format
- Make the required changes to the MS Word document including formatting, inserting tables, graphs, and pictures and save it.
- After Agenda or Minutes in the MS Word format is finalized, log into BLISS and Click ‘Import word’ button and upload the edited file in BLISS.
- All the changes will be updated in BLISS as well.
Please note: This feature works only if user defined template is used for creating Agenda/ Minutes.
a. For unlisted companies – Meeting in which Accounts are approvedb. For listed companies- Board Meeting convening the AGM
- To maintain earlier versions of draft agenda/ minutes circulated within the team for their inputs
- Records of email notices sent of the agenda and minutes to Directors and KMP
- Get distinct list of Mail IDs in the email tab such as Users, Directors, Equity and Preference Shareholders etc., based on mail IDs entered in respective registers. BLISS shall also prompt Mail ID based on previous mails sent
- Maintain proof of circulating agenda, draft minutes and final minutes in BLISS
- Access different versions of drafts and final document created
- Go to company records and select the meeting for which you wish to circulate Agenda Notice/ Minutes to the Directors
- Click ‘Agenda’ button to mail Agenda Notice and Click ‘Minutes’ button to mail Minutes of the Meetings
- Select the agenda/minutes file type option to be emailed – pdf or word
- Click ‘email’ button
- Select email ids of the directors and invitees to whom you wish to send the mail. If your Register of Directors & KMP is updated in BLISS, click the Directors checkbox to get prefilled email ids of all the Directors. Otherwise please add e-mail id of the Directors.
- For Agenda, tick ‘Include Calendar Invite’ checkbox if you wish to add calendar invite for the meeting
- Make desired changes to the subject and body of the mail
- Click ‘Send’ button to send the email and confirm the list of recipients
- Go to Records, click on the meeting from which you wish to take the Extract of Resolutions
- Click on ‘Minutes’ button to go to the Minutes
- Minutes module for the selected meeting opens
- Click ‘Upload doc template’ button
- Refer the available ‘sample template’ and token dictionary to define your template
- Upload the defined template for Extracts for once.
- Click on the Company from which the extract is to be downloaded Click on Records page
- Click on the particular meeting
- Click on ‘Minutes’ button
- Click on the word or PDF icon appearing for every Agenda item to download extract in word or PDF respectively
- The extract gets downloaded as per user-defined template, for you to sign and hand it over to the business users.
For all the agenda items with supporting documents, users can mark if the annexures are uploaded along with the document or it will be tabled at meeting. BLISS caution the users, when they miss to upload any attachment/annexure for a particular Agenda Item for which they have selected “Attached as Annexure”. This feature eliminates the chance of errors and makes BLISS more error-proof.
- Create your meeting agenda using BLISS
- Go to the agenda item for which you wish to upload any annexure
- Click on the pin icon and select ‘Attached as Annexure’ option
- Click upload icon to upload the annexure
When the user selects the option ‘Attached as Annexure’ but missed uploading the annexure, on saving the agenda, BLISS gives the caution message that the upload of annexure has been missed for the particular agenda item.
- Click on Agenda tab select the type of meeting
- Agenda module for the selected meeting opens
- Click save button and click ‘Upload doc template’ button
- Refer the available ‘sample template’ and token dictionary to define your template
- Upload the defined agenda template for once.
- Create your meeting agenda using BLISS and download it as per your defined template
For Board/ Committee Minutes:
- Click on Minutes tab, select the meeting for which minutes are due
- Minutes module for the selected meeting opens
- Click ‘Upload doc template’ button
- Refer the available ‘sample template’ and token dictionary to define your template
- Upload the defined minutes template for once.
- Create your meeting minutes using BLISS and download it as per your defined template
For Circular Resolution:
- Click on Minutes tab, select the type of Circular Resolution- Board Meeting or Sub-committee Meeting (For Sub-committee Circular Resolution select the type of committee)
- Circular Resolution module for the selected meeting opens
- Click ‘Upload doc template’ button
- Refer the available ‘sample template’ and token dictionary to define your template
- Upload the defined minutes template for once.
- Create your meeting minutes using BLISS and download it as per your defined template
- Create your meeting agenda using BLISS
- Make sure token template for the agenda is uploaded
- Save the agenda/minutes and update meeting details
- Click ‘PDF’ button to download the Agenda with inline attachments
- Turn ‘PDF Inline Attachments’ toggle to ON for attachments to come inline with the particular resolution. If the toggle is OFF, attachments will be available at the end of the Agenda document
- Click ‘Email’ button to send the agenda with inline attachments using BLISS mail feature or click ‘Print’ to download the agenda with inline attachments.
- Attachment/ supporting document attached to the resolution will be available next to the particular resolution
Further, option to add inline attachment is also available for annotations if the ‘Inline Attachment’ toggle under ‘Settings’ page is turned ‘ON’.
Agenda documents and minutes of the Board or Subcommittee meetings can be downloaded from BLISS with bookmark facility that eases navigating through the Board documents. This feature is available for documents created using token templates feature in BLISS. It enhances the readability of the document by enabling the Directors to switch between agenda items where the meeting has large number of agenda items by just clicking the bookmarked titles. In addition, the positioning of the attachments to there solutions can be either at the end of the document or at the end of each resolution.
- Create your meeting agenda/minutes using BLISS
- Make sure user defined token template for the agenda/minutes is uploaded
- Save the agenda/minutes and update meeting details
- Click ‘PDF’ button to download the Agenda/Minutes in a PDF file
- Open the Agenda/Minutes PDF file with Adobe Acrobat Reader
- Click ‘Bookmark’ ribbon available on left hand side
- Agenda Index will be available.Click any item and get navigated to it
Please Note:This feature is available only when Token templates are used to generate the Agenda/Minutes.
- Create your meeting agenda using BLISS
- Based on the agenda created, BLISS generates the draft minutes automatically
- Make the necessary changes to the minutes generated by BLISS and click ‘Save’
- Update the Meeting Details and update ‘Starting Page no. for minute’
- Select the chairperson and mark the attendance
- Add invitees, if any and mark if there is in-house company secretary appointed
- Click ‘Save’
- Click ‘Final’ to finalise the minutes
- Select PDF or Word to download the minutes along with page numbering
With BLISS, you don’t have to keep track of the serial numbers for Board Meetings, Sub-committee Meetings and Shareholders’ Meetings. Based on the last meeting’s serial number updated in Company Profile, serial number for subsequent meetings gets auto populated. All the meetings created using BLISS gets synchronised for display in the Records repository under the specified folder financial year wise and are arranged based on the serial no. of the meetings.
Steps to Automate Meeting Serial Numbers
- When you register your Company in BLISS, along with other company details, the last meetings’ serial numbers can be updated
- Please update serial number of company’s last Board Meeting, AGM and EGM in the right-hand side of the Company Profile screen
- For sub-committees, go to sub-committee module under Company Data and update last committee serial number for all the constituted committees
- Please note serial numbers updated are editable
- Once last serial numbers are update for all type of meetings, for all the subsequent meeting records created in BLISS, serial number of the meeting gets auto populated.
All the meetings created using BLISS can be viewed in serial order of the meeting number under the Records page.
Please note: Automated Serial Number is editable for any sort of customization of meeting serial number format.
BLISS enables users to create agenda for the Board Meeting/ Sub-committee Meetings/ Shareholders’ Meeting. For which draft of pre-populated resolutions depending on the type of meeting along with list of other curated and editable resolutions are available. Based on the agenda created, BLISS auto-generates draft minutes of the meeting and also captures the preamble of agenda item for easy reference to update the minutes gist. This reduces the time and effort in drafting minutes, also ensures that nothing critical is missed out from a compliance perspective.
How to get auto-generated minutes?
- Go to ‘Agenda’ tab and select type of meeting
- Create agenda of the meeting. List of pre-populated resolutions will be available depending on the type of meeting selected. Add other necessary resolutions from the list of resolutions available or create a customised agenda item
- Save your agenda, update meeting details and finalise the agenda once approved
- To get minutes, go to ‘Minutes’ tab and select the meeting for which you wish to generate minutes
- Based on the agenda items added in agenda, minutes of the meeting with same agenda items and resolutions will be generated
- Update the minutes gist for all the agenda items. Please note BLISS displays the preamble part of the agenda items in the minutes for easy reference.
- Add any other item with the permission of Chair, if any
- Click ‘Save’ and update ‘Meeting Details’. Finalise the minutes once approved
Draft/final minutes of the meeting can be circulated to the Directors through e-mail option available in BLISS which also captures the proof of delivery for the same.
BLISS enables users to define their templates for Agenda, Minutes and Circular Resolutions of their Board and Committee Meetings. This feature helps them generate documents confirming to their style guide: the design, look and feel, by just defining it once in our template.
Steps to define document template-
Login to BLISS and click on the particular Company
For Board/ Committee Agenda:
- Click on Agenda tab select the type of meeting
- Agenda module for the selected meeting opens
- Click save button and click ‘Upload doc template’ button
- Refer the available ‘sample template’ and token dictionary to define your template
- Upload the defined agenda template for once.
- Create your meeting agenda using BLISS and download it as per your defined template
For Board/ Committee Minutes:
- Click on Minutes tab, select the meeting for which minutes are due
- Minutes module for the selected meeting opens
- Click ‘Upload doc template’ button
- Refer the available ‘sample template’ and token dictionary to define your template
- Upload the defined minutes template for once.
- Create your meeting minutes using BLISS and download it as per your defined template
For Circular Resolution:
- Click on Minutes tab, select the type of Circular Resolution- Board Meeting or Sub-committee Meeting (For Sub-committee Circular Resolution select the type of committee).
- Circular Resolution module for the selected meeting opens
- Click ‘Upload doc template’ button
- Refer the available ‘sample template’ and token dictionary to define your template
- Upload the defined minutes template for once.
- Create your meeting minutes using BLISS and download it as per your defined template
Please note that the defined template uploaded once will be considered every time you create Agenda/ Minutes/ Circular resolution. Further, the template-based document generation is applicable only for meetings with Agenda Notice dated 03 August 2019 and after as this is the date on which this feature is released.
BLISS provides a provision for the Secretarial Team and Directors of the company to comment on the Board Docket. Annotations can be marked as public/private in the Board Docket. The public annotations are notified to other Directors and Secretarial Team. This feature also enhances communication among the CS and Directors.
Steps to add annotation in the Board Docket
For Secretarial Team:
- Once the agenda/ minutes of the meeting is published, it is available for adding any further comments or annotations
- Go to the Records Page and identify the meeting for which you wish to review the Board Docket
- Open the document (agenda/ minutes/ circular resolution) as available under Key Information and Annotations column
- The document is available for the annotations. Select the text for which you wish to add a comment and click annotate
- Enter the comment and select the view as ‘Post to Public or Only me’.
For Directors with access to BLISSDOCS App:
- Once the agenda/ minutes of the meeting is available for the Directors review in BLISSDOCS app, the Directors can add their comments or annotations
- Open the BLISSDOCS app from your android/IOS mobile phone/tab
- Open the particular company and click on the dashboard
- Click on the dropdown available on the top of the screen and select Records (To review Circular Resolution, select Voting Records from the dropdown)
- Click on the Board Doc/ Minutes you wish to review
- The document is available for the annotations. Select the text for which you wish to add a comment and click annotate
- Enter the comment and select the view as ‘Post to Public or Only me.
For Directors without access to BLISSDOCS APP (Web):
- Once the agenda/ minutes of the meeting is available for the Directors review, the Directors can add their comments or annotations
- Login to BLISS and click on the particular company to review the available records.
- Go to the Records Page and open the Board Doc/ minutes/ circular resolution you wish to review
- The document is available for the annotations. Select the text for which you wish to add a comment and click annotate
- Enter the comment and select the view as ‘Post to Public or Only me’
Please note: For a public comment, other users can also add a reply to it. Records page will indicate the public annotations marked with total annotation count. Both, Secretarial Team and the Directors will be notified via mail when the public annotation is marked by anyone. Directors with BLISSDOCS app access will receive a push notification for the same.
BLISS allows user to replicate the entire agenda of already completed meeting to a new agenda more efficiently. The agenda can be replicated both for the same company and from one company to another. This feature saves a lot of time and effort as well as enhances the productivity of the Secretarial team.
There are two ways to replicate agenda: 1. Records Page 2. Agenda of Completed Meeting
Steps to Replicate Agenda- Records Page
- Go to Records page and identify the meeting of which agenda is required to be replicated
- Make sure Agenda and Minutes Status of the particular meeting is ‘complete’
- Click on the particular meeting and click ‘Replicate’ button
- Select the Company in which you wish to replicate the same agenda and click ‘Replicate’
- A draft agenda with same agenda items will be created in the selected company’s Records page
- Save the agenda and update meeting details
Steps to Replicate Agenda-Agenda of Completed Meeting
- Go to Records page and identify the meeting of which agenda is required to be replicated
- Make sure Agenda and Minutes Status of the particular meeting is ‘complete’
- Open the agenda of the selected meeting and verify the agenda items to be replicated to a new agenda
- Click ‘Replicate’ button available in agenda module
- A draft agenda with same agenda items will be created in the Records page
- Save the agenda and update meeting details
With BLISS, you don’t have to keep track of the serial numbers for Board Meetings, Sub-committee Meetings and Shareholders’ Meetings. Based on the last meeting’s serial number updated in Company Profile, serial number for subsequent meetings gets auto populated.
Steps to Automate Meeting Serial Numbers
- When you register your Company in BLISS, along with other company details, the last meetings’ serial numbers can be updated
- Please update serial number of company’s last Board Meeting, AGM and EGM in the right-hand side of the Company Profile screen
- Select the sub-committee, if any constituted in the Company and update last meeting’s serial number
- After updating all other company details, click ‘Save’. Please note serial numbers updated are editable and can be edited after clicking ‘Edit’ button and the option to edit is available only with the Admin of the Company
- Once last serial numbers are update for all type of meetings, for all the subsequent meeting records created in BLISS, serial number of the meeting gets auto populated.
Please note: Automated Serial Number is editable for any sort of customization of meeting serial number format
BLISS enables the user to make a one-time entry of the list of Permanent Invitees to the Board /Sub-committee meetings. Once entered, the list of Permanent Invitees get auto populated to the meeting details of the Board / Sub-committee meetings.
Steps to get auto-populated List of Permanent Invitees
- In Company Data, go to Permanent Invitee tab
- Click ‘Add Permanent Invitee’ button to add invitees
- Update Invitee’s Name, Role and Name of the Organization Represented
- List of Permanent Invitees added will be auto populated to meeting details of the Board/ Sub-committee Meetings
Keep your Meeting Details updated with BLISS by updating your Register of Directors and KMPs. For adding new directors,
Steps to Add New Director
- Select the Registers module in the Company you want
- Select the Register of Directors and KMP
- Add the new director in your Register of Directors and KMP with details of the new appointment
- Ensure that the date of the board meeting in which the appointment was made is updated
- For all the meetings post the date of Board Resolution, BLISS will capture name and designation of the newly appointed Director under the meeting details section
For Directors who have ceased to be directors, please take the following steps:
Deleting an existing Director on retirement or resignation
- Select the Registers module in the Company you want
- Select the Register of Directors and KMP
- Select the entry of a Director who ceases to form part of the Board
- Update the Date of cessation of office for that Director
- On updating the date of cessation, for all the meetings post that date, BLISS will not capture the name of the Director who ceased to be a Director of the Company.
Short cut to Remove Director from Meeting Details:
- Select your meeting from Records page
- Go to Minutes and click ‘Meeting Details’ button
- Select the Retiring Director and click the delete (X) button
BLISS provides pre-populated resolutions for Shareholders’ Meeting notice with a repository of fifty plus curated and editable resolutions for Ordinary and Special Business. In addition to the resolutions, BLISS enables the user to create for shareholder meetings the following:
- Notes to the Agenda notice
- Explanatory Statement for Special Business
- Admission Slip for shareholders
- Proxy Form for shareholders
- Route map for the meeting venue
- Generate Shorter notice consent letters from shareholders
This reduces the time and effort in drafting the agenda and other documents and also ensures that nothing critical is missed out from a compliance perspective.
Steps to create Shareholders Meeting Agenda
- Go to Agenda, select the type of Shareholders Meeting i.e. Annual General Meeting or Extraordinary General Meeting
- Ready to use Agenda templates with Pre-Populated Ordinary Business Agenda items will be available
- Add any further resolutions required from the pre-drafted repository using the Search option by entering the key words
- Select the agenda item and drag and drop it to the center of the screen
- Place it as per desired serial order through move item toggle
- Update the required details for all agenda items or make changes as required
- Save the agenda and update meeting details
The agenda can be downloaded/emailed as a pdf or a word file which includes Meeting Agenda, Notes to the Agenda, Explanatory Statement if any, Admission Slip, Proxy Form, Route Map of Meeting Venue and Shorter notice consent letters template in case meeting is called at shorter notice Further, prefilled shorter notice consent letters can be generated if details of all the members are updated in Register of Members in BLISS.
BLISS enables users to create a customized agenda item as per their requirement where the user can draft their own proposal and proposed resolution. A provision is also provided to select the Register and Returns that needs to be triggered when this agenda item is approved. Based on the user selection, the selected register and return will also get triggered as a pending activity on finalization of the minutes.
Steps to add customized agenda item
- Go to Agenda, select the preferred meeting.
- Ready to use Agenda templates with Pre-Populated Agenda items will be available.
- The last item in the list of curated agenda items in all the meeting types is the ‘Customized Agenda Items’. Drag and drop the item to the center of the screen.
- Enter the agenda item’s title, select the Register and Return required to be updated for that item and click ‘Submit’.
- Draft the proposal and proposed resolution for the customized agenda item added.
- Place it as per desired serial order through move item toggle.
BLISS provides pre-populated resolutions for the Board/ Committees/ Shareholders’ Meeting agenda along with the list of curated and editable resolutions based on the requirements of Secretarial Standards for unlisted companies and LODR requirements for listed companies. This reduces the time and effort in drafting resolutions and also ensures that nothing critical is missed out from a compliance perspective.
Steps to add agenda items
- Go to Agenda, select the preferred meeting
- Ready to use Agenda templates with Pre-Populated Agenda items will be available as specified
- For unlisted companies -The First Board Meeting, The Meeting in which Accounts are approved and Periodic Board Meetings
- For listed companies-Quarterly Board Meetings, Board Meeting convening the AGM and Event Based Board Meetings
- Add any further resolutions required from the pre-drafted repository using the Search option by entering the key words
- Select the agenda item and drag and drop it to the center of the screen
- Place it as per desired serial order through move item toggle
- Update the required details for all agenda items or make changes as required
- Save the agenda and update meeting details
BLISS enables the user to search previously completed resolutions from the same company as well as other companies in the user’s portfolio and replicate it into a new agenda created for the company.
Steps for Search and Replicate Resolutions
- Select the type of meeting to prepare your agenda
- Click on Search, select the company from where you wish to replicate the resolution and enter a keyword for search
- Select the filter- Agenda/Minutes and search
BLISS will show all resolutions with the searched keyword in search result. Choose your resolution and click ‘Replicate’. Selected resolution will be replicated to the new agenda created for the company.
- View these documents without downloading the file either in pdf or word format after every edit
- Refresh the already opened annotation page to view the changes/ edits made in the document
- Secretarial team can view the final version as it would appear to Director and Invitees.
- Annotations done by Directors to any of these documents will be available in the creation page itself in addition to the view from the Records page
- Select your Meeting Agenda from the options available in BLISS
- To add new agenda items as required, move to the pre-drafted repository available on the left side of your screen
- Search the required agenda item using the Search option by entering the key words or add a customised agenda item
- Select the agenda item and click the arrow to add the same
- Enter the sequence number where you want the agenda item placed and click ‘set’ button
- The new agenda item will be positioned in the selected sequence number
- Upload attachments and annexures related to a specific agenda item.
- Upload multiple files relating to a particular agenda item in a single click. Upto 30 pdf files can be attached per agenda item (PDF file of max. size 10 MB).
- For all the agenda items with supporting documents, users can mark if the annexures are uploaded along with the document or it will be tabled at meeting. BLISS caution the users, when they miss to upload any attachment/annexure for a particular Agenda Item for which they have selected “Attached as Annexure.”
- Option to take print of Board Meeting/ Committee Meeting Agenda with inline attachments.
- Upload and store multiple annexures, any meeting related documents, approved and signed meeting agenda and minutes for records, etc. (Support all type of documents).
- Upload board presentation, if any
- Retrieve uploaded documents easily with ‘Search’ feature or go to records page and select the particular meeting to access all the related records uploaded.
- Prepare your meeting agenda using BLISS
- Save it and update the Meeting Details for date, time, and venue for the meeting
- Identify the items that you do not wish to share with the specific users
- Click ‘Restrict Agenda Item’ button and select the Users who can view the restricted agenda item
- Click ‘Pdf’ or ‘word’ icon to download/ email the agenda with specific items
- Select the items you wish to download/ email
- Click ‘email’ button to email the agenda and click ‘print’ button to download the agenda.
- Prepare your meeting agenda using BLISS
- Save and update the meeting details
- Go to the sensitive/confidential agenda item for which you wish to restrict the view for select users
- Select the Directors/ Committee Members/ Invitees who who can view the agenda item
- Click ‘Submit’ button to save.
This restricted view is enabled for the select user when they log into BLISSPLUS or BLISSLISTED and BLISSDOCS, our paperless Board app.
- In Company Data, go to ‘Manage Templates’ tab to access all the uploaded templates
- Go to ‘Search Filter’ and select document type, meeting type and sub-meeting type
- To modify any existing template, click edit button. Download the existing template, make the necessary changes and upload the revised template
- To delete any existing template, click ‘delete’ button
- For date-based templates, search particular template, click edit button and update ‘Active to’ date and add a new template for the current period. For eg. Change in registered office address effective from a specific date.
- Agenda Pre-populated with all the mandated items -based on Companies Act, 2013 and Secretarial Standards for unlisted companies and LODR for listed companies.
- Add a customised agenda item to the prepopulated items
- Provision to place the attachments inline, i.e. after each agenda item or to have all the annexures placed at the end of the agenda document
- Create and assign task related to any agenda item to other users
- Grouping of multiple agenda items of same nature together like statutory items, Accounts & Audit related items, Business Issues etc.
- Customise the look and feel of the document using user-defined agenda template confirming to users’ style guide
- View agenda in preview mode to mark any comments, to track changes done by other users or create multiple versions of the agenda
- Download the document in a pdf or word.
- User can also use the word download to make changes to the agenda and the final word doc can be uploaded back to BLISS using Word Import feature to restore all the changes
- Replicate the same agenda to other companies in the group or to the same company
- Upload Signed Documents and Meeting Presentations for each meeting
- Get triggers for all the compliances on finalising the agenda with regard to related registers, returns or other actions
- Circulate the meeting agenda to the Directors using BLISS email function along with a calendar invite
- Provision to mark annotations for the recipient of the agenda. The annotation view of agenda can also be used to present the agenda during the meeting.
- The templates for Board and Subcommittee agenda and minutes can be defined in a template to match the users style guide.
- Provision to add hyperlinked Table of Contents enabling easy navigation for Directors between the agenda items.
- User defined fields for inserting Snippets to the Agenda Title, Actions required for a specific agenda item, attachment details (File name) and page numbers can also be customized and added to the Agenda Index.
- The user can use different templates for different periods, as defined by them
- At the users’ choice, attachments can be placed after each agenda item or at the end of the documents.
- Login to BLISS and click on the desired Company
- Go to ‘Manage Templates’ tab available under ‘Company Data’
- Click ‘Add’ button and select document type, meeting type and sub-meeting type, if any (In case the template is same for all sub-meetings, leave sub-meeting type as blank)
- Define the period for the template by updating ‘Active From’ and ‘Active To’ date. For the current period, leave ‘Active To’ date field as blank
- Click ‘Choose file’ button to select the template
- Click ‘Upload’ button
Steps to search/modify uploaded templates
- Go to ‘Manage Templates’ tab available under ‘Company Data’
- Under Search Filters, select the document type, meeting type and sub-meeting type if any
- All the existing templates based on the search will appear
- Select the template you wish to modify and click ‘edit’ button
- Make the required changes and click ‘Update’ button
Please note: All the existing templates are moved to Manage Templates module under Company Data, which now provides more controls.
- In Company Data, go to User Rights
- Click ‘Add User’ button and update first name, last name and email ID of the new user
- Under Role, select ‘Director’
- Select the required filters for the type of records the Director is given access to
- Select the period for which records can be viewed by that user and whether the user has access to draft documents too.
- Set access validity end date and click ‘Submit’.
Go to the Sub-committee meeting agenda, where the User added as a Director of the Company is an invitee in the respective committee meeting. Update the details and email id of such Director as an invitee under Agenda Meeting Details.
- In Company Data, go to User Rights
- Click ‘Add User’ button and update first name, last name and email ID of the new user
- Under Role, select ‘Invitee’
- Select the required filters for the type of records the Invitee should be allowed to access
- Select the period for which records can be viewed by that user and select among drafts and final documents
- Set access validity end date and click ‘Submit’.
Go to sub-committee tab under Company Data and add name and email id of such user as a member of the respective sub-committee.
- In Company Data, go to User Rights
- Click ‘Add User’ button and update first name, last name and email ID of the new user
- Under Role, select ‘Invitee’
- Select the required filters for the type of records new user should be allowed to access
- Select the period for which records can be viewed by the Invitee
- Set access validity end date and click ‘Submit’.
Make sure details of the Invitee along with his/her mail id must be added in the meeting details of the respective meeting and the mail id entered in User Rights page should match with the mail id entered in the Meeting Details.
- Prepare your meeting agenda using BLISS
- Save the agenda and click ‘Meeting Details’ button
- Update the meeting details with regard to date, time and venue of the meeting
- Scroll down to Directors/Members of the Committee/Invitees details
- Drag and drop to re-arrange the order as desired
- Selected order will appear in the minutes and attendance sheet of the meeting
- Go to Records Page
- Click on the required financial year
- Scroll to the required meeting category
- Go to the specified meeting row for which signed agenda/minutes is to be viewed
- Click Agenda-View/ Minutes-View under the Signed Documents column to access the list of signed documents uploaded by the Secretarial Team
- Click on the document to view the same
Please note: Only PDF files can be uploaded in Signed Document folders. If any files are already uploaded in Signed Documents folder, those will be available under Agenda section.
MS Word file import facility for Agenda and Minutes
BLISS has released a new significant feature on June 8th by which Agenda and Minutes can be downloaded in MS Word file format from BLISS for subsequent edits and modifications. This feature will help the secretarial team to update BLISS with the final version of the Agenda and Minutes files once the content is approved by all concerned. Users can also utilize Word’s advanced editing features with this provision.
Steps to import edited MS Word file of agenda/minutes in BLISS
- Prepare your agenda/minutes using BLISS.
- Save the agenda and update meeting details
- Click ‘Download as doc’ button to download the draft agenda in MS Word file format
- Make the required changes to the MS Word document including formatting, inserting tables, graphs, and pictures and save it.
- After Agenda or Minutes in the MS Word format is finalized, log into BLISS and Click ‘Import word’ button and upload the edited file in BLISS.
- All the changes will be updated in BLISS as well.
Please note: This feature works only if user defined template is used for creating Agenda/ Minutes.
BLISS provides curated Board Agenda Notice for meeting in which Annual Accounts are to be approved and AGM is convened with all the resolutions require as specified in the Mandatory Secretarial Standards for unlisted companies and LODR for listed companies.
This reduces the time and effort in drafting resolutions and also ensures that nothing critical is missed out from the compliance perspective.
Steps to create Board Meeting Agenda
1. Go to New Agenda, select the Board Meeting
2. Ready to use Agenda templates with Pre-Populated Agenda items will be available as specified
- For unlisted companies – Meeting in which Accounts are approved
- For listed companies- Board Meeting convening the AGM
3. Add any further resolutions required from the pre-drafted repository using the Search option by entering the key words
4. Select the agenda item and drag and drop it to the center of the screen
5. Place it as per desired serial order through move item toggle
6. Update the required details for all agenda items or make changes as required
7. Save the agenda and update meeting details
- To maintain earlier versions of draft agenda/ minutes circulated within the team for their inputs
- Records of email notices sent of the agenda and minutes to Directors and KMP
- Get distinct list of Mail IDs in the email tab such as Users, Directors, Equity and Preference Shareholders etc., based on mail IDs entered in respective registers. BLISS shall also prompt Mail ID based on previous mails sent
- Maintain proof of circulating agenda, draft minutes and final minutes in BLISS
- Access different versions of drafts and final document created
- Go to company records and select the meeting for which you wish to circulate Agenda Notice/ Minutes to the Directors
- Click ‘Agenda’ button to mail Agenda Notice and Click ‘Minutes’ button to mail Minutes of the Meetings
- Select the agenda/minutes file type option to be emailed – pdf or word
- Click ‘email’ button
- Select email ids of the directors and invitees to whom you wish to send the mail. If your Register of Directors & KMP is updated in BLISS, click the Directors checkbox to get prefilled email ids of all the Directors. Otherwise please add e-mail id of the Directors.
- For Agenda, tick ‘Include Calendar Invite’ checkbox if you wish to add calendar invite for the meeting
- Make desired changes to the subject and body of the mail
- Click ‘Send’ button to send the email and confirm the list of recipients
- Go to Records, click on the meeting from which you wish to take the Extract of Resolutions
- Click on ‘Minutes’ button to go to the Minutes
- Minutes module for the selected meeting opens
- Click ‘Upload doc template’ button
- Refer the available ‘sample template’ and token dictionary to define your template
- Upload the defined template for Extracts for once.
- Click on the Company from which the extract is to be downloaded Click on Records page
- Click on the particular meeting
- Click on ‘Minutes’ button
- Click on the word or PDF icon appearing for every Agenda item to download extract in word or PDF respectively
- The extract gets downloaded as per user-defined template, for you to sign and hand it over to the business users.
For all the agenda items with supporting documents, users can mark if the annexures are uploaded along with the document or it will be tabled at meeting. BLISS caution the users, when they miss to upload any attachment/annexure for a particular Agenda Item for which they have selected “Attached as Annexure”. This feature eliminates the chance of errors and makes BLISS more error-proof.
- Create your meeting agenda using BLISS
- Go to the agenda item for which you wish to upload any annexure
- Click on the pin icon and select ‘Attached as Annexure’ option
- Click upload icon to upload the annexure
When the user selects the option ‘Attached as Annexure’ but missed uploading the annexure, on saving the agenda, BLISS gives the caution message that the upload of annexure has been missed for the particular agenda item.
- Click on Agenda tab select the type of meeting
- Agenda module for the selected meeting opens
- Click save button and click ‘Upload doc template’ button
- Refer the available ‘sample template’ and token dictionary to define your template
- Upload the defined agenda template for once.
- Create your meeting agenda using BLISS and download it as per your defined template
For Board/ Committee Minutes:
- Click on Minutes tab, select the meeting for which minutes are due
- Minutes module for the selected meeting opens
- Click ‘Upload doc template’ button
- Refer the available ‘sample template’ and token dictionary to define your template
- Upload the defined minutes template for once.
- Create your meeting minutes using BLISS and download it as per your defined template
For Circular Resolution:
- Click on Minutes tab, select the type of Circular Resolution- Board Meeting or Sub-committee Meeting (For Sub-committee Circular Resolution select the type of committee)
- Circular Resolution module for the selected meeting opens
- Click ‘Upload doc template’ button
- Refer the available ‘sample template’ and token dictionary to define your template
- Upload the defined minutes template for once.
- Create your meeting minutes using BLISS and download it as per your defined template
- Create your meeting agenda using BLISS
- Make sure token template for the agenda is uploaded
- Save the agenda/minutes and update meeting details
- Click ‘PDF’ button to download the Agenda with inline attachments
- Turn ‘PDF Inline Attachments’ toggle to ON for attachments to come inline with the particular resolution. If the toggle is OFF, attachments will be available at the end of the Agenda document
- Click ‘Email’ button to send the agenda with inline attachments using BLISS mail feature or click ‘Print’ to download the agenda with inline attachments.
- Attachment/ supporting document attached to the resolution will be available next to the particular resolution
Further, option to add inline attachment is also available for annotations if the ‘Inline Attachment’ toggle under ‘Settings’ page is turned ‘ON’.
Agenda documents and minutes of the Board or Subcommittee meetings can be downloaded from BLISS with bookmark facility that eases navigating through the Board documents. This feature is available for documents created using token templates feature in BLISS. It enhances the readability of the document by enabling the Directors to switch between agenda items where the meeting has large number of agenda items by just clicking the bookmarked titles. In addition, the positioning of the attachments to there solutions can be either at the end of the document or at the end of each resolution.
- Create your meeting agenda/minutes using BLISS
- Make sure user defined token template for the agenda/minutes is uploaded
- Save the agenda/minutes and update meeting details
- Click ‘PDF’ button to download the Agenda/Minutes in a PDF file
- Open the Agenda/Minutes PDF file with Adobe Acrobat Reader
- Click ‘Bookmark’ ribbon available on left hand side
- Agenda Index will be available.Click any item and get navigated to it
Please Note:This feature is available only when Token templates are used to generate the Agenda/Minutes.
- Create your meeting agenda using BLISS
- Based on the agenda created, BLISS generates the draft minutes automatically
- Make the necessary changes to the minutes generated by BLISS and click ‘Save’
- Update the Meeting Details and update ‘Starting Page no. for minute’
- Select the chairperson and mark the attendance
- Add invitees, if any and mark if there is in-house company secretary appointed
- Click ‘Save’
- Click ‘Final’ to finalise the minutes
- Select PDF or Word to download the minutes along with page numbering
With BLISS, you don’t have to keep track of the serial numbers for Board Meetings, Sub-committee Meetings and Shareholders’ Meetings. Based on the last meeting’s serial number updated in Company Profile, serial number for subsequent meetings gets auto populated. All the meetings created using BLISS gets synchronised for display in the Records repository under the specified folder financial year wise and are arranged based on the serial no. of the meetings.
Steps to Automate Meeting Serial Numbers
- When you register your Company in BLISS, along with other company details, the last meetings’ serial numbers can be updated
- Please update serial number of company’s last Board Meeting, AGM and EGM in the right-hand side of the Company Profile screen
- For sub-committees, go to sub-committee module under Company Data and update last committee serial number for all the constituted committees
- Please note serial numbers updated are editable
- Once last serial numbers are update for all type of meetings, for all the subsequent meeting records created in BLISS, serial number of the meeting gets auto populated.
All the meetings created using BLISS can be viewed in serial order of the meeting number under the Records page.
Please note: Automated Serial Number is editable for any sort of customization of meeting serial number format.
BLISS enables users to create agenda for the Board Meeting/ Sub-committee Meetings/ Shareholders’ Meeting. For which draft of pre-populated resolutions depending on the type of meeting along with list of other curated and editable resolutions are available. Based on the agenda created, BLISS auto-generates draft minutes of the meeting and also captures the preamble of agenda item for easy reference to update the minutes gist. This reduces the time and effort in drafting minutes, also ensures that nothing critical is missed out from a compliance perspective.
How to get auto-generated minutes?
- Go to ‘Agenda’ tab and select type of meeting
- Create agenda of the meeting. List of pre-populated resolutions will be available depending on the type of meeting selected. Add other necessary resolutions from the list of resolutions available or create a customised agenda item
- Save your agenda, update meeting details and finalise the agenda once approved
- To get minutes, go to ‘Minutes’ tab and select the meeting for which you wish to generate minutes
- Based on the agenda items added in agenda, minutes of the meeting with same agenda items and resolutions will be generated
- Update the minutes gist for all the agenda items. Please note BLISS displays the preamble part of the agenda items in the minutes for easy reference.
- Add any other item with the permission of Chair, if any
- Click ‘Save’ and update ‘Meeting Details’. Finalise the minutes once approved
Draft/final minutes of the meeting can be circulated to the Directors through e-mail option available in BLISS which also captures the proof of delivery for the same.
BLISS enables users to define their templates for Agenda, Minutes and Circular Resolutions of their Board and Committee Meetings. This feature helps them generate documents confirming to their style guide: the design, look and feel, by just defining it once in our template.
Steps to define document template-
Login to BLISS and click on the particular Company
For Board/ Committee Agenda:
- Click on Agenda tab select the type of meeting
- Agenda module for the selected meeting opens
- Click save button and click ‘Upload doc template’ button
- Refer the available ‘sample template’ and token dictionary to define your template
- Upload the defined agenda template for once.
- Create your meeting agenda using BLISS and download it as per your defined template
For Board/ Committee Minutes:
- Click on Minutes tab, select the meeting for which minutes are due
- Minutes module for the selected meeting opens
- Click ‘Upload doc template’ button
- Refer the available ‘sample template’ and token dictionary to define your template
- Upload the defined minutes template for once.
- Create your meeting minutes using BLISS and download it as per your defined template
For Circular Resolution:
- Click on Minutes tab, select the type of Circular Resolution- Board Meeting or Sub-committee Meeting (For Sub-committee Circular Resolution select the type of committee).
- Circular Resolution module for the selected meeting opens
- Click ‘Upload doc template’ button
- Refer the available ‘sample template’ and token dictionary to define your template
- Upload the defined minutes template for once.
- Create your meeting minutes using BLISS and download it as per your defined template
Please note that the defined template uploaded once will be considered every time you create Agenda/ Minutes/ Circular resolution. Further, the template-based document generation is applicable only for meetings with Agenda Notice dated 03 August 2019 and after as this is the date on which this feature is released.
BLISS provides a provision for the Secretarial Team and Directors of the company to comment on the Board Docket. Annotations can be marked as public/private in the Board Docket. The public annotations are notified to other Directors and Secretarial Team. This feature also enhances communication among the CS and Directors.
Steps to add annotation in the Board Docket
For Secretarial Team:
- Once the agenda/ minutes of the meeting is published, it is available for adding any further comments or annotations
- Go to the Records Page and identify the meeting for which you wish to review the Board Docket
- Open the document (agenda/ minutes/ circular resolution) as available under Key Information and Annotations column
- The document is available for the annotations. Select the text for which you wish to add a comment and click annotate
- Enter the comment and select the view as ‘Post to Public or Only me’.
For Directors with access to BLISSDOCS App:
- Once the agenda/ minutes of the meeting is available for the Directors review in BLISSDOCS app, the Directors can add their comments or annotations
- Open the BLISSDOCS app from your android/IOS mobile phone/tab
- Open the particular company and click on the dashboard
- Click on the dropdown available on the top of the screen and select Records (To review Circular Resolution, select Voting Records from the dropdown)
- Click on the Board Doc/ Minutes you wish to review
- The document is available for the annotations. Select the text for which you wish to add a comment and click annotate
- Enter the comment and select the view as ‘Post to Public or Only me.
For Directors without access to BLISSDOCS APP (Web):
- Once the agenda/ minutes of the meeting is available for the Directors review, the Directors can add their comments or annotations
- Login to BLISS and click on the particular company to review the available records.
- Go to the Records Page and open the Board Doc/ minutes/ circular resolution you wish to review
- The document is available for the annotations. Select the text for which you wish to add a comment and click annotate
- Enter the comment and select the view as ‘Post to Public or Only me’
Please note: For a public comment, other users can also add a reply to it. Records page will indicate the public annotations marked with total annotation count. Both, Secretarial Team and the Directors will be notified via mail when the public annotation is marked by anyone. Directors with BLISSDOCS app access will receive a push notification for the same.
BLISS allows user to replicate the entire agenda of already completed meeting to a new agenda more efficiently. The agenda can be replicated both for the same company and from one company to another. This feature saves a lot of time and effort as well as enhances the productivity of the Secretarial team.
There are two ways to replicate agenda: 1. Records Page 2. Agenda of Completed Meeting
Steps to Replicate Agenda- Records Page
- Go to Records page and identify the meeting of which agenda is required to be replicated
- Make sure Agenda and Minutes Status of the particular meeting is ‘complete’
- Click on the particular meeting and click ‘Replicate’ button
- Select the Company in which you wish to replicate the same agenda and click ‘Replicate’
- A draft agenda with same agenda items will be created in the selected company’s Records page
- Save the agenda and update meeting details
Steps to Replicate Agenda-Agenda of Completed Meeting
- Go to Records page and identify the meeting of which agenda is required to be replicated
- Make sure Agenda and Minutes Status of the particular meeting is ‘complete’
- Open the agenda of the selected meeting and verify the agenda items to be replicated to a new agenda
- Click ‘Replicate’ button available in agenda module
- A draft agenda with same agenda items will be created in the Records page
- Save the agenda and update meeting details
With BLISS, you don’t have to keep track of the serial numbers for Board Meetings, Sub-committee Meetings and Shareholders’ Meetings. Based on the last meeting’s serial number updated in Company Profile, serial number for subsequent meetings gets auto populated.
Steps to Automate Meeting Serial Numbers
- When you register your Company in BLISS, along with other company details, the last meetings’ serial numbers can be updated
- Please update serial number of company’s last Board Meeting, AGM and EGM in the right-hand side of the Company Profile screen
- Select the sub-committee, if any constituted in the Company and update last meeting’s serial number
- After updating all other company details, click ‘Save’. Please note serial numbers updated are editable and can be edited after clicking ‘Edit’ button and the option to edit is available only with the Admin of the Company
- Once last serial numbers are update for all type of meetings, for all the subsequent meeting records created in BLISS, serial number of the meeting gets auto populated.
Please note: Automated Serial Number is editable for any sort of customization of meeting serial number format
BLISS enables the user to make a one-time entry of the list of Permanent Invitees to the Board /Sub-committee meetings. Once entered, the list of Permanent Invitees get auto populated to the meeting details of the Board / Sub-committee meetings.
Steps to get auto-populated List of Permanent Invitees
- In Company Data, go to Permanent Invitee tab
- Click ‘Add Permanent Invitee’ button to add invitees
- Update Invitee’s Name, Role and Name of the Organization Represented
- List of Permanent Invitees added will be auto populated to meeting details of the Board/ Sub-committee Meetings
Keep your Meeting Details updated with BLISS by updating your Register of Directors and KMPs. For adding new directors,
Steps to Add New Director
- Select the Registers module in the Company you want
- Select the Register of Directors and KMP
- Add the new director in your Register of Directors and KMP with details of the new appointment
- Ensure that the date of the board meeting in which the appointment was made is updated
- For all the meetings post the date of Board Resolution, BLISS will capture name and designation of the newly appointed Director under the meeting details section
For Directors who have ceased to be directors, please take the following steps:
Deleting an existing Director on retirement or resignation
- Select the Registers module in the Company you want
- Select the Register of Directors and KMP
- Select the entry of a Director who ceases to form part of the Board
- Update the Date of cessation of office for that Director
- On updating the date of cessation, for all the meetings post that date, BLISS will not capture the name of the Director who ceased to be a Director of the Company.
Short cut to Remove Director from Meeting Details:
- Select your meeting from Records page
- Go to Minutes and click ‘Meeting Details’ button
- Select the Retiring Director and click the delete (X) button
BLISS provides pre-populated resolutions for Shareholders’ Meeting notice with a repository of fifty plus curated and editable resolutions for Ordinary and Special Business. In addition to the resolutions, BLISS enables the user to create for shareholder meetings the following:
- Notes to the Agenda notice
- Explanatory Statement for Special Business
- Admission Slip for shareholders
- Proxy Form for shareholders
- Route map for the meeting venue
- Generate Shorter notice consent letters from shareholders
This reduces the time and effort in drafting the agenda and other documents and also ensures that nothing critical is missed out from a compliance perspective.
Steps to create Shareholders Meeting Agenda
- Go to Agenda, select the type of Shareholders Meeting i.e. Annual General Meeting or Extraordinary General Meeting
- Ready to use Agenda templates with Pre-Populated Ordinary Business Agenda items will be available
- Add any further resolutions required from the pre-drafted repository using the Search option by entering the key words
- Select the agenda item and drag and drop it to the center of the screen
- Place it as per desired serial order through move item toggle
- Update the required details for all agenda items or make changes as required
- Save the agenda and update meeting details
The agenda can be downloaded/emailed as a pdf or a word file which includes Meeting Agenda, Notes to the Agenda, Explanatory Statement if any, Admission Slip, Proxy Form, Route Map of Meeting Venue and Shorter notice consent letters template in case meeting is called at shorter notice Further, prefilled shorter notice consent letters can be generated if details of all the members are updated in Register of Members in BLISS.
BLISS enables users to create a customized agenda item as per their requirement where the user can draft their own proposal and proposed resolution. A provision is also provided to select the Register and Returns that needs to be triggered when this agenda item is approved. Based on the user selection, the selected register and return will also get triggered as a pending activity on finalization of the minutes.
Steps to add customized agenda item
- Go to Agenda, select the preferred meeting.
- Ready to use Agenda templates with Pre-Populated Agenda items will be available.
- The last item in the list of curated agenda items in all the meeting types is the ‘Customized Agenda Items’. Drag and drop the item to the center of the screen.
- Enter the agenda item’s title, select the Register and Return required to be updated for that item and click ‘Submit’.
- Draft the proposal and proposed resolution for the customized agenda item added.
- Place it as per desired serial order through move item toggle.
BLISS provides pre-populated resolutions for the Board/ Committees/ Shareholders’ Meeting agenda along with the list of curated and editable resolutions based on the requirements of Secretarial Standards for unlisted companies and LODR requirements for listed companies. This reduces the time and effort in drafting resolutions and also ensures that nothing critical is missed out from a compliance perspective.
Steps to add agenda items
- Go to Agenda, select the preferred meeting
- Ready to use Agenda templates with Pre-Populated Agenda items will be available as specified
- For unlisted companies -The First Board Meeting, The Meeting in which Accounts are approved and Periodic Board Meetings
- For listed companies-Quarterly Board Meetings, Board Meeting convening the AGM and Event Based Board Meetings
- Add any further resolutions required from the pre-drafted repository using the Search option by entering the key words
- Select the agenda item and drag and drop it to the center of the screen
- Place it as per desired serial order through move item toggle
- Update the required details for all agenda items or make changes as required
- Save the agenda and update meeting details
BLISS enables the user to search previously completed resolutions from the same company as well as other companies in the user’s portfolio and replicate it into a new agenda created for the company.
Steps for Search and Replicate Resolutions
- Select the type of meeting to prepare your agenda
- Click on Search, select the company from where you wish to replicate the resolution and enter a keyword for search
- Select the filter- Agenda/Minutes and search
BLISS will show all resolutions with the searched keyword in search result. Choose your resolution and click ‘Replicate’. Selected resolution will be replicated to the new agenda created for the company.
Circular Resolution
- Click on ‘Minutes Tab’ and select option to create Circular Resolution
- Add desired resolution from BLISS Resolutions Repository or create customized agenda item.
- Add required details in the resolution or make changes as required
- Upload attachment, if any
- Number the Circular Resolutions for your record and click ‘Save’
- Finalize the Circular Resolution and Click ‘Vote by email’ to send mail with voting option to the members
- Completed Circular Resolutions will be populated by BLISS in your next Board Meeting
- Create a circular resolution only for the items permitted by the Companies Act, 2013. If you use pre-populated resolutions in BLISS, the software does not permit non-authorized items to be taken up as a circular resolution.
- Email the circular resolution to all the Directors using BLISS with a provision to vote for Circular Resolutions and keep track of the mails along with the proof of delivery.
- The circular resolution proposed and emailed is automatically available in BLISS Records page for future reference.
- You have the option to print the resolution along with any attachments that is uploaded for the circular resolution.
- The Circular Resolution passed is automatically pre-populated in the next Board Meeting scheduled.
- The records page in BLISS which is the e-Repository will store all the Circular Resolutions passed in that Financial Year.
- You can download extract of passed resolutions from the Circular Resolutions available in Records Page, either in word or PDF and share it with the required third parties like Banks, counter party to contracts or government departments.
Business exigencies may require a company to propose and get approval of the directors for a circular resolution. With BLISS you can now easily create a Circular Resolution and mail it to the directors for their approval and directors to cast their vote using a single click on the email received by them. Further, after their approval, as required by the Companies Act, 2013, the circular resolution will get automatically pre-populated in the next board meeting for ratification.
Benefits of using BLISS for Circular Resolutions:
- Create a circular resolution only for the permitted items that can be taken up through circular resolution. If you use pre-populated resolutions in BLISS, the software does not permit non-authorized items to be taken up as a circular resolution.
- Email the circular resolution to all the Directors using BLISS with a provision to vote for Circular Resolutions and keep track of the mails along with the proof of delivery.
- The circular resolution proposed and emailed is automatically available in BLISS Records page for future reference.
- You have the option to print the resolution along with any attachments that is uploaded for the circular resolution.
- The Circular Resolution passed is automatically pre-populated in the next Board Meeting/Committee Meeting scheduled.
- The records page in BLISS which is the e-Repository will store all the Circular Resolutions passed in that Financial Year.
- You can download extract of passed resolutions from the Circular Resolutions available in Records Page, either in word or PDF and share it with the required third parties like Banks, counter party to contracts or government departments.
Steps to Create a Circular Resolution
- Click on ‘Minutes Tab’ and select option to create Circular Resolution
- Add desired resolution from BLISS Resolutions Repository or create customized agenda item.
- Add required details in the resolution or make changes as required
- Upload attachment, if any
- Enter the Serial Number of the Circular Resolution and click ‘Save’
- Finalize the Circular Resolution and Click ‘Vote by email’ to send mail with voting option to the members
- Completed Circular Resolutions will be populated by BLISS in your next Board Meeting/Committee Meeting

- Vote through mail received: Secretarial team can enable the option available in the Circular Resolution module for the Directors/ Members of the particular Committee to cast their vote through the voting provision available in the Circular Resolution mail received by them.
- Web login: Directors and Members of the particular Committee to login to BLISS and cast their Vote through the option available in Records page.
- BLISSDOCS: BLISSDOCS users can cast their vote through the BLISSDOCS app.
2. The Directors/Members can cast their vote on a particular circular resolution of the Board or Sub-Committee and can also add comments to their vote where required.
- Proposed Circular Resolution along with necessary attachments is received by the Directors and Committee Members in their mail box
- Directors and Committee Members can cast their vote For/Against/ Abstain on the Circular Resolution using BLISS with a single click
- Directors/Committee Members can also share their comments or observations regarding Circular Resolution in the comment section available in the mail
- User-defined template can be used for Circular Resolution after setting it up one time for multiple use.
- Ensure only permitted items under the Companies Act, 2013 can be taken up through circular resolution.
- Email the circular resolution to all the Directors using BLISS with a provision to vote for Circular Resolutions and keep track of the mails along with the proof of delivery
- Provision to upload signed documents related to the Circular Resolution
- The Circular Resolution passed is automatically pre-populated in the next Meeting scheduled for ratification
- The records page in BLISS stores all the Circular Resolutions passed Financial Year wise
- Download extract of passed resolutions from the Circular Resolutions available in Records Page, either in word or PDF and share it with the required third parties like Banks, counter party to contracts or government departments
- Provision to replicate a Circular Resolution both for the same company and from one company in the group to another company in the group
- Seamless Integration with MS Word for editing Circular Resolution. Download Circular Resolution in MS Word file format from BLISS, make necessary changes and upload the same file using ‘Word Import’ feature
- Provision for Directors to mark annotations as a public or private comment for the Circular Resolution.
- Define the approval time for Circular resolutions
- Go to Records page and scroll down to Circular Resolutions section
- Click on Circular Resolution that is required to be replicated
- Click on the ‘Replicate Button’ available in the pop-up screen or open the particular Circular Resolution and click the ‘Replicate Icon’
- Select the Company in which you wish to replicate the particular Circular Resolution and click ‘Replicate’ button
- A draft Circular Resolution with same agenda item will be created in the selected company
- Make necessary changes to resolution and Save it.
- Go to Records Page
- Scroll down to Circular Resolutions folder and select the particular Circular Resolution for which voting record is to be uploaded
- Go to the selected Circular Resolution and click ‘Signed Documents’ icon to upload the voting record. Please note multiple files can be stored in the ‘Signed Documents’ repository
How to access records uploaded in the Signed Documents Repository
- Go to Records Page
- Select the particular Circular Resolution for which voting record is to be retrieved
- Click ‘Signed Documents’ icon to download the documents
BLISS enables the Directors and Members of Board and Committee respectively, to vote For /Against / Abstain from voting on a Circular Resolution. Based on the number of Directors and members on the Board or Committee, respectively, voted, the approval date for the Board and Committee Circular Resolution also gets updated on obtaining majority votes in favour.
Subsequently, an auto-generated mail intimating the voting status is sent to the Admin and the Secretarial Team can view the voting details from the Records Page.
Different modes of Voting available for Directors & Members of the Committees in BLISS
- Vote through mail received: Secretarial team to enable the option available in the Circular Resolution module for the Directors/ Members of the particular Committee to cast their vote through the voting provision available in the Circular Resolution mail received by them.
i. Secretarial Team to create a Circular Resolution through the option available under ‘Minutes’ tab
ii. Add the desired resolution from the repository available and make required changes
iii. Save the Circular Resolution, add Serial No. and enter the Publish Date
iv. Click ‘Final’ button to finalise
v. Click ‘Vote by e-mail’ button to send Circular Resolution mail with option available to cast the vote
- Web login: Directors and Members of the particular Committee to login to BLISS and cast their Vote through the option available in Records page.
i. Once the Secretarial Team creates a Circular resolution, it will be available to the Directors/ Members of the particular committee
ii. Directors to login to BLISS and navigate to Circular Resolution section in the Records Page
iii. Click on ‘hand’ symbol to cast the vote and click ‘Submit’
- BLISSDOCS: BLISSDOCS users can cast their vote through the BLISSDOCS app.
i. Once the Secretarial Team creates a Circular Resolution, Directors/ Members of the particular committee will get a push notification on their mobile phone or tab
ii. Click the notification and get directed to the voting screen or open the BLISSDOCS app and navigate to Voting Records
iii. Cast the vote and click ‘Submit’
BLISS allows the users to create and mail Circular Resolution for all their constituted Committees with facility for auto-updating approval date based on the day majority of members of the committee voted in favour of the Circular Resolution and sends a mail to the Admin and the Editors of the Company that the Circular Resolution is approved. Approved Circular Resolution of the committee also gets noted in the next committee meeting automatically.
Please Note:
- Entries for all the members of the Sub Committee should be updated in the Register of Director and KMP along with their e-mail id
- The name of members should be selected as a member in the Sub Committee module under Company Data
- The e-mail id in the register and the e-mail id with which the user logs in to BLISS should be same.
Steps to create Sub-Committee Circular resolutions:
- Go to your company and click ‘Minutes’ tab
- Select ‘Circular resolution – Sub-Committee Meeting’ and then select the type of committee from the list of constituted committees as marked ‘Y’ under Sub-committee module
- Create the required Circular Resolution
- Click ‘Save’ and update the Circular Resolution Publish Date
- Click ‘Final’ button to finalise.
- Click ‘Vote by email’ to send mail with voting option to the members
The Members of the committee can vote for/vote against/abstain from voting on a circular resolution through the mail received or through their Web login. BLISSDOCS users can also cast their vote through the BLISSDOCS app.
Note: Approval date does not get updated if the majority of directors have not casted their vote in favour of the Circular Resolution within Seven days.
BLISS helps users to create circular resolutions more efficiently by creating, circulating and tracking it, which includes populating it in the next Board Meeting for the board to take note of it. This ensures that the Secretarial Team does not miss out on the procedural requirement to place the approved circular resolution in the next Board Meeting for the Board to take note of it.
How to Create Circular Resolution and to enable BLISS to track it
- Go to the Minutes tab in the Company and select Circular Resolution
- Select the desired resolution from BLISS Resolutions Repository or create your own customized agenda item.
- Number the circular resolutions for your record
- Upload attachment related to the circular resolution
- Download/ email the circular resolution by clicking on the pdf/ Word icon
- Upload signed copies of circular resolutions received from Directors giving their response for your record.
- Once finalised, the circular resolutions will be populated by BLISS in the next Board meeting, whenever it is scheduled.
Business exigencies may require a company to propose and get approval of the directors for a circular resolution. With BLISS you can now easily create a Circular Resolution and mail it to the directors for their approval. Further, after their approval, as required by the Companies Act, 2013, the circular resolution will get automatically pre-populated in the next board meeting for ratification.
Benefits of using BLISS for Circular Resolutions:
- Create a circular resolution only for the permitted items that can be taken up through circular resolution. If you use pre-populated resolutions in BLISS, the software does not permit non-authorized items to be taken up as a circular resolution.
- You can email the circular resolution to all the Directors using BLISS and keep track of the mails sent along with the proof of delivery.
- The circular resolution proposed and emailed is automatically available in BLISS Records page for future reference.
- You have the option to print the resolution along with any attachments that is uploaded for the circular resolution.
- The Circular Resolution passed is automatically pre-populated in the next Board Meeting scheduled.
- The records page in BLISS which is the e-Repository will store all the Circular Resolutions passed in that Financial Year.
- You can download extract of passed resolutions from the Circular Resolutions available in Records Page, either in word or PDF and share it with the required third parties like Banks, counter party to contracts or government departments.
Steps to Create a Circular Resolution
- Click on ‘Minutes Tab’ and select option to create Circular Resolution
- Add desired resolution from BLISS Resolutions Repository or create customized agenda item.
- Add required details in the resolution or make changes as required
- Upload attachment, if any
- Number the Circular Resolutions for your record and click ‘Save’
- Finalize the Circular Resolution and update the date of passing Circular Resolution
- Completed Circular Resolutions will be populated by BLISS in your next Board Meeting
Document Storage and Retrieval
- In Company Data, go to User Rights
- Click ‘Add User’ button and update first name, last name and email ID of the new user
- Under Role, select Customised Viewer
- Select the required filters for the type of records new user should be allowed to access
- Select the period for which records can be viewed by that user and select among drafts and final documents
- Set access validity end date and click ‘Submit’.
- Go to ‘records’ page
- Click ‘Print All’ on the right top corner
- Choose to download in PDF or Word & excel zipped file
- BLISS will e-mail you a link to download the zip file containing the Agendas, Minutes, Registers and Return challans
- Login to BLISS and go to your Company
- Navigate to ‘past records’ tab
- Turn on the ‘OCR Page Credits Used’ toggle switch
- Upload PDF documents in the past record section
- Store all the digitized secretarial records for the earlier years. The Past Records Repository accepts all types of files like .pdf, .doc, .docx, .xls, .xlsb, .msg, .ppt making it a comprehensive repository.
- User defined folders: Create any number of additional folders with customised names for uploading various files.
- Easy retrieval of uploaded records by entering a key word in the ‘Search’ feature. Further, if documents uploaded are in machine readable format it can search for content within the document as well.
- Users can view the files from past records right on the browser instead of downloading it in their device for viewing. This also provides security by restricting download of company’s confidential data for other users except the Admin.
- Provision for Admin/Editor to restore or permanently delete the files deleted by other users from the Past Records repository.
- The admin user can lock/ unlock the past records either for an entire Financial Year or for a particular meeting/s which prevents any further upload of records from the team member in a locked FY or in a finalised meeting.
- Digitized secretarial records: Get your historical secretarial records digitised by availing our Digitisation Services and get them uploaded in BLISS Past records Repository for anytime- anywhere access
- Easy retrieval: Uploaded records can be easily retrieved by entering a key word in the ‘Search’ bar. If the documents uploaded are in machine readable format it can search within the document as well
- Organised Repository: Provision to upload the documents category wise- Board Meetings, Sub-Committee Meeting or Shareholder Meeting-Annual General Meeting or Extraordinary General Meeting. All the documents related to any particular meeting are available at same place.
- Update critical comments: Provision to store critical decisions taken at the meeting for easy reference
- Comprehensive repository: The Past Records Repository accepts all types of files like .pdf, .doc, .docx, .xls, .xlsb, .msg, .ppt
- Add Customised sections: Provision to add new customised sections where any other documents can also be uploaded
- Secured Records: Allows users to view the files from past records right on the browser instead of downloading it in their device for viewing. This also provides security by restricting download of company’s confidential data.
- Admin Control: Only users with Admin Rights are allowed to download the records uploaded under Past Records. Other users can only view the records.
- Go to the respective Company
- Click on ‘Search bar’ available on top right of the screen
- Enter a key word related to the document you want to search; please note the word should be of minimum 3-character length
- Select the period by entering From and To dates
- Select ‘Past Records’ filter from the category of records
- Click ‘Search’
- Search results related to the searched key word will be available
- Click ‘Show’ button to navigate to the Financial Year in which the respective document is uploaded
BLISS enables the Auditors to access the Company’s Secretarial Records for the purpose of audit online.
The Admin of a company can give access to the Auditor by adding them as Customized Viewers, which enables them to select the secretarial records for the given year, including control over what the auditors can see, i.e. final documents only or all documents including the draft, Statutory Registers and Returns. Further they can also select the period for which the Auditor can access the records and can set the access validity end date.
Steps to give Customised Access to the Auditors
- In Company Data, go to User Rights
- Click ‘Add User’ button and update first name, last name and email ID of the Auditor
- Under Role, select Customised Viewer
- Select the required filters for the type of records the Auditor should be allowed to access
- Select the period for which records can be viewed by the Auditor and select among drafts and final documents
- Set access validity end date and click ‘Submit’.
Please note the Auditor who is given access to the Company’s Records can access BLISS only after creating an account in BLISS by registering the auditors’ name and their mail ID in BLISS.
- Login to BLISS and go to your company
- Go to Records page
- Scroll down to user-defined folder before Register folder
- Click ‘Edit’ button to name the folder
- Select date, upload the document and update remarks if required
- Click ‘Done’ to upload the document
- Click ‘Save’ button
BLISS has the provision for the Admin of a company to create users with customized viewing rights, i.e. to provide for specific period by specifying from and to dates, including the nature or type of records that they can view i.e., Agenda, Minutes, Registers, Returns and Action Tracker. Further, they can also set the access validity end date, when the access given to the viewer will be automatically withdrawn.
Steps to add Customised Viewer
- In Company Data, go to User Rights
- Click ‘Add User’ button and update first name, last name and email ID of the new user
- Under Role, select Customised Viewer
- Select the required filters for the type of records new user should be allowed to access
- Select the period for which records can be viewed by that user and select among drafts and final documents
- Set access validity end date and click ‘Submit’.
Please note the Customised Viewer added by the Admin can access BLISS only after registering their name, their mail ID and setting up a password for their BLISS access.
BLISS provides one point storage to keep all meeting related documents for their easy retrieval.
Steps
- Upload attachments related to specific agenda item using upload for that Agenda item (PDF file of max. size 10 MB)
- Upload and store multiple annexures, meeting related documents and signed agenda for records, in the Signed Documents icon available in the Agenda module (support file types like word, pdf, excel)
- Presentation prepared for the Board meeting can be uploaded under the Presentation Icon in the Agenda Module in pdf file format.
Once uploaded in BLISS all these documents can be easily retrieved using the ‘Search’ feature.
Secretarial records are required to be maintained for eight years and they often resemble a haystack. Often the need is to find a specific record or entry. BLISS provides three types of intelligent search to find the needle in your haystack:
- Search your entire secretarial records or a part of it- Agenda, Minutes, Registers, Returns and Action Trackers by using a keyword in the search option provided in BLISS. Further you can also replicate any resolution passed in previous meeting of the same company or another company in your portfolio by the click of a button.
- Search for a specific resolutions or a Company Law prescribed template, using smart search from our rich repository by entering the keyword.
- From your large portfolio, search for a specific company by using the ‘Alphabetic Search’ or the ‘Intelligent Search’ by entering the first few letters of your company name.
All the records created using BLISS gets automatically stored financial year wise to the respective folders like Board Meetings, Sub-committee Meetings or Shareholders’ Meeting. Further, the records of Circular Resolutions, Finalised Registers and Returns and other approved Actions are also automatically stored in distinct folders of that financial year, enabling easy retrieval.
- Systematic Maintenance of Records- Meeting Agenda and Minutes get synchronized to the respective folder such as Board Meeting, Sub-committee Meeting or Shareholders’ Meeting in accordance to Meeting Serial Number
- Option to update Key Information for any meeting that the user needs to go back to
- Get Proof of Delivery for Agenda and the draft and final Minutes circulated to the Directors using BLISS email facility.
- User defined folder- Upload any other financial year related documents like Annual Reports-Financial Statements and Board of Director’s Report
- Search feature- Search your entire secretarial records or a part of it- Agenda, Minutes, Registers, Returns and Action Trackers by using any keyword in the search option provided in BLISS.
- Print All- User with Admin rights can take back up of all the records as available in the Records Repository through Print All feature.
All this when you just use BLISS without needing to do anything more.
BLISS provides users a provision where signed agenda and minutes can be stored. This functionality provides ease of access to records.
How to store signed Agenda and Minutes in BLISS
- Go to Records Page
- Select the particular meeting for which signed agenda/minutes is to be uploaded
- To upload signed agenda, open the Agenda through ‘Agenda’ button and to upload signed Minutes, open the minutes through ‘Minutes’ button.
- Click ‘Signed Documents’ icon to upload signed agenda/minutes. Please note multiple documents can be stored in the ‘Signed Documents’ repository,
How to access documents uploaded in the Signed Documents Repository
- Go to Records Page
- Select the particular meeting for which signed agenda/minutes is to be retrieved
- To retrieve signed agenda, open the agenda through ‘Agenda’ button and to retrieve signed minutes, open the minutes through ‘Minutes’ button.
- Click ‘Signed Documents’ icon to download the documents
BLISS has a provision to store records uploaded in the Past Records Repository. For the records once uploaded in the Past Records Repository, the right to hard delete these records is not provided to all users. When a user with drafter rights deletes a record, the file will move to the Restore bin and the drafter cannot delete files from the Restore bin. Only users with the Admin / Editor rights will have the right to delete records permanently (hard delete) from the restore bin.
Steps for users with Admin/ Editor rights to restore deleted documents from Restore Bin.
- Select the company in which you need to restore the document
- Go to the Company data and in company data to the Restore bin
- Select the file you want to restore
- After selecting the file, click the restore button
- On clicking the restore button, the file will be restored in its original place from where it was deleted.
At any point of time, you can take a copy of all your records created using BLISS with our ‘Print All’ function. Users who are Admin of their Company can access the Print All function. By clicking on the Print All function, a zipped folder with all the secretarial records for that financial year is systematically organized in respective folders of Board Meetings, Sub-committee meetings, Shareholder meetings and will be sent to Admin’s email id registered with BLISS.
Steps to use ‘Print All’
- Go to Records Page, select the Financial Year for which you want to take back up
- Click ‘Print All’
- Select from the options to download zipped files in Pdf or Word & Excel and confirm
- A mail will be sent to the Admin with all the documents created in the respective Financial Year.
This function will work at the back-end and may take a few minutes before the user gets the zipped files mailed to them.
BLISS enables its users to mark key decisions taken in any Board Meeting, Committee Meeting and Shareholders Meeting by capturing the summary for ready reference.
Steps for updating Key Information:
- Go to Records, select the particular meeting for which you wish to update Key Information like Buy-back of shares, Dividend payment, Bonus issue, Allotment of shares and Acquisition of Shares in companies.
- Under Key Information, click the comment icon.
- Enter the Key Information and save.
- Go to Records page to view the Key Information available on the screen.
The meeting for which Key Information is updated, the icon will turn to blue which enables the user to identify that the meeting has key information recorded in it.
In BLISS, you can store at two places – in the E-repository and in the Records page. A smart storage practice would be to:
- Upload Memorandum and Articles, Shareholder Agreements and Loan Agreements in E-repository as these are not limited to any financial year.
- Upload Annual Reports-Financial Statements and Board of Director’s Report in the Records page under the specific financial year as these are related to the financial year.
- Upload declaration of interest received from Directors in the Register of Directors.
Please make sure maximum file size is less than 10MB.
Registers and Returns
Maintain all statutory registers of your company electronically in BLISS as per the formats prescribed in the Companies Act, 2013. After the Agenda/Minutes of the Meeting is finalised, BLISS triggers the pending registers to be updated based on the agenda items. Further, you can generate reports of any sub-set of data as on any given date for the information available in the Registers.
You can update the Registers by clicking the ‘Add’ button and enter specific entries one by one or for first time update of Registers in BLISS, you can download our template in Excel format and upload it into BLISS in a single click. Generate reports from your registers as on any given date such as List of Directors or List of Members etc.
How to update the Pending Registers triggered in BLISS?
- Login to BLISS and go to your Company
- Navigate to ‘Registers’ tab
- Under the ‘Registers’ tab list of pending registers based on the agenda items are available along with due dates
- Click on the register to update the details and save it
Please Note: If any of the Statutory Register is already updated or if it is maintained physically or by Registrar & Share Transfer Agent, the user can close the pending registers in BLISS by entering appropriate comment which would get stored in BLISS and be available under ‘Updated Register’ tab for future reference.
- Create an Annual General Meeting (AGM) agenda using BLISS
- The AGM agenda must have a pre-populated resolution for ‘Approval of Financial Statement and Board’s Report by the Small Companies’
- Save the agenda and update the meeting details
- Auto-filled Form MGT-7A will trigger under the Returns page
- Click on the download button under the head ‘Pre-filled Download’ corresponding to the triggered Form MGT-7A
- Latest version of the auto filled Form MGT 7A gets downloaded
- After filing the return with ROC, filed return and challan can be stored in BLISS e-repository for company records.
Please Note: The Auto-fill of Form MGT-7A is based on the records updated for previous financial year and financial information details of the company as updated in BLISS.
- Reference of all the Meetings for which Registers and Returns are triggered to ensure timely compliance and keep the evidence for Secretarial / Statutory Audits.
- Users authorised to receive reminders, get alerts for the pending registers and returns along with its due date.
- Register of Directors and KMP, Register of Members and Register of Charges are auto-filled with data captured at the time of agenda creation in BLISS and also generate prefilled forms-MGT 7, PAS 3, ADT 1, DIR 12, CHG 1 and CHG 4.
- Any change made to the Meeting date in the Agenda or the Approval date in Circular Resolution automatically updates all the connected due dates for the related Registers and Returns that were triggered as pending activities.
- All the statutory registers can be updated in BLISS itself and for returns, once the return is filed with MCA, the filed return along with the challan and SRN can be stored in BLISS.
- E-repository for the financial year automatically gets populated with all the finalised registers and returns to build institutional memory.
- Creation of Charge:
(1)Based on the details of the charge created entered, a new entry gets created in the Register of Charges.(2)Once the agenda is created in BLISS, e-form CHG 1 gets triggered as a pending return to be filed under ‘Returns’ tab. Click on the download link to download auto-filled form
- Satisfaction of Charge:
(1)Based on the details of the charge satisfied entered, entry created at the time of creation of charge gets automatically updated in the Register of Charges.
(2)Once the agenda is created in BLISS, e-form CHG 4 gets triggered as a pending return to be filed under ‘Returns’ tab. Click on the download link to download auto-filled form.
6. After filing the return with ROC, filed return and challan can be stored in BLISS e-repository for company records.
- Go to Company Data and click ‘Financial Information’ tab
- Click on ‘Edit’ button to update all the details including Company’s Capital Structure, Principle Activities, Details of Subsidiaries and Financial Information
- Click ‘Save’ button to save all the details. Please note all the details entered are editable at any point of time
- Make sure all the meeting records for the last financial year are created in BLISS
- Make sure Register of Directors & KMP and Register of Members is upto date
- Create your Annual General Meeting Agenda and Minutes using BLISS
- Once the AGM Agenda is finalized, MGT-7 gets triggered as a pending return in the Returns tab
- Go to Returns, click on download link to download auto-filled MGT-7 form (BLISS downloads latest version of the form as available on MCA.)
- Create your Annual General Meeting Agenda and Minutes using BLISS
- Once the AGM agenda is finalized, e- form ADT 1 gets triggered as a pending return in the Returns tab
- Go to Returns, click on download link
- Update necessary details of the auditor to be appointed and click ‘Submit’ button
- Auto-filled ADT 1 form will be downloaded.
After filing the return with ROC, filed return and challan can be stored in BLISS e-repository for company records.
- Create your meeting agenda in BLISS with ‘Appointment of Additional Director’ as one of the proposed agenda items.
- Select the icon available for data entry in the agenda item -Appointment of Additional Director.
- Update the Director’s details and click on ‘Save’ button.
- Form DIR 2 and DIR 8-Once the data is saved in the resolution, you can download /print auto filled DIR 2 and DIR 8 forms.
- Save the meeting agenda, update the meeting details to finalize the agenda.
- Register of Directors & KMP– Based on the details of the Director entered, a new entry gets added automatically in the Register of Directors and KMP for the newly appointed Director for the user to confirm.
- E-form DIR-12– Once the agenda is finalized, e-form DIR 12 gets triggered as a pending return to be filed under ‘Returns’ tab. Click on the download link to download an auto-filled form for filing with ROC.
After filing the return with ROC, filed return and challan can be stored in BLISS e-repository for company records.
BLISS helps in capturing and recording re-appointment of a Director in the Company, by providing multiple dates of appointment to accommodate reappointment of Directors. This enables BLISS users to access and track the history of a Directors previous appointment dates in the Register of Directors and KMP.
Steps to record multiple appointment/reappointment dates for Directors
- Update your Register of Directors and KMP using BLISS
- Click on the entry for the Director for whom you wish to add their history of their original appointment and reappointment dates
- Click edit button
- Scroll down to ‘Previous appointment dates in the company’ field
- Click ‘+’ button to add the tenure of all the previous appointment/reappointment
- Click ‘Save’ button to save the changes
BLISS allows users to keep Meeting Attendance Registers digitally. Users can download attendance sheet through BLISS and get it signed from the Directors/Members as the case may be and upload it back for records. The attendance sheet downloaded from BLISS also capture the Directors’ designation automatically from the designation as updated in Company’s Register of Directors and KMPs.
Steps to update Meeting Attendance Registers in BLISS
- Create the meeting agenda using BLISS for the Board meeting/ Sub-committee Meeting/ Shareholders’ Meeting
- Save the agenda and update the meeting details
- Once the agenda of the meeting is finalized, Attendance Register for the particular meeting will be triggered as a pending register under the ‘Registers’ tab
- Click on the Attendance Register and download the Attendance Sheet in a pdf or word
- The Attendance Sheet downloaded through BLISS will have all the meeting details, names of the Directors/ Members and their designation
- Post meeting, signed attendance sheet can be uploaded under the same pending attendance register in the ‘Register’ tab
- After uploading the attendance sheet, confirm it to ‘Y’ and click ‘Final’
- Finalized register entries are available in Records page
Make sure Register of Directors and KMP of your company is updated in BLISS in order to capture the Directors’ details for the Attendance Sheets.
BLISS enables users to download auto-filled Annual Return of the Company in e-form MGT 7. On the basis of records updated for the last financial year and financial information of the company, BLISS auto-fills the Annual Return form.
To get a complete Annual Return, please ensure that you have used BLISS for all the secretarial activities in that financial year, i.e. all board meetings, shareholder meetings, updated all your registers in BLISS.
How to generate auto-filled forms
- Go to Company Data and click ‘Financial Information’ tab
- Click on ‘Edit’ button to update all the details including Company’s Capital Structure, Principle Activities, Details of Subsidiaries and Financial Information
- Click ‘Save’ button to save all the details. Please note all the details entered are editable at any point of time
- Make sure all the meeting records for the last financial year are created in BLISS
- Make sure Register of Directors & KMP and Register of Members is upto date
- Create your Annual General Meeting Agenda and Minutes using BLISS
- Once the AGM Minutes are finalized, MGT-7 gets triggered as a pending return in the Returns tab
- Go to Returns, click on download link to download auto-filled MGT-7 form.
Please note BLISS downloads latest version of the form as available on MCA.
BLISS allows users to keep Meeting Attendance Registers digitally. Users can download attendance sheet through BLISS and get it signed from the Directors/Members as the case may be and upload it back for records.
Steps to update Meeting Attendance Registers in BLISS
- Create the meeting agenda using BLISS for the Board meeting/ Sub-committee Meeting/ Shareholders’ Meeting
- Save the agenda and update the meeting details
- Once the agenda of the meeting is finalized, Attendance Register for the particular meeting will be triggered as a pending register under the ‘Registers’ tab
- Click on the Attendance Register and download the Attendance Sheet from the given link
- The Attendance Sheet downloaded through BLISS will have all the meeting details and names of the Directors/ Members as the case may be
- Post meeting, signed attendance sheet can be uploaded under the same pending attendance register in the ‘Register’ tab
- After uploading the attendance sheet, confirm it to ‘Y’ and click ‘Final’
- Finalized register entries are available in Records page
BLISS provides users with a provision to download prefilled Form CHG-1 along with auto filled Register of charges by updating the important details related to the charge created at the time of creation of Agenda of the meeting. This feature reduces data entry errors and save a lot of time and effort.
How to generate auto-filled forms
- Create your meeting agenda in BLISS with borrowings from Banks and financial Institutions as one of the item.
- Click on the icon available in the agenda item .
- Update all the details related to the charge created and click on ‘Save’ button.
- Save the meeting agenda, update the meeting details and finalize the agenda.
- Register of Charges- Based on the details of the charge created entered, a new entry gets created in the Register of Charges.
- E-form CHG 1– Once the minutes are finalized, e-form CHG 1 gets triggered as a pending return to be filed under ‘Returns’ tab. Click on the download link to download auto-filled form.
- After filing the return with ROC, filled return and challan can be stored in BLISS e-repository for company records.
BLISS enables users to download auto-filled e-form ADT 1 (Notice of appointment of auditors by the company). On the basis of details updated by the user, BLISS auto-fills the e-form.
How to generate auto-filled form
- Create your Annual General Meeting Agenda and Minutes using BLISS
- Once the AGM Minutes are finalized, e- form ADT 1 gets triggered as a pending return in the Returns tab
- Go to Returns, click on download link
- Update necessary details of the auditor to be appointed and click ‘Submit’ button
- Auto-filled ADT 1 form will be downloaded
Based on the information filled in BLISS by the users at the time of creation of the resolution, BLISS automates and enables the users to download auto-filled DIR 2 -Director’s consent letter in form and DIR 8-Intimation by Director to be submitted by the Director to the company and e-form DIR 12 to be filled by the company with ROC on appointment of Director. Further, the same data is used to update the company’s Register of Directors and KMP with the new appointment.
How to generate auto-filled forms and update your registers
- Create your meeting agenda in BLISS with appointment of Director as one of the proposed item.
- Click on the icon available in the agenda item for appointment of Director.
- Update all the details required in the module of the Director and click on ‘Save’ button.
- Once the data is saved, you can download /print auto filled DIR 2 and DIR 8 forms.
- Save the meeting agenda, update the meeting details and finalize the agenda.
- Register of Directors & KMP- Based on the details of the Director entered, a new entry gets created for the newly appointed Director.
- E-form DIR-12– Once the minutes are finalized, e-form DIR 12 gets triggered as a pending return to be filed under ‘Returns’ tab. Click on the download link to download an auto-filled form for filing with ROC.
- After filing the return with ROC, filled return and challan can be stored in BLISS e-repository for company records.
BLISS enables users to update their Register of Members with a single click based on data in Agenda and Minutes. At the time of creation of Agenda for Allotment of Shares, the user can fill all the required details of members and these details will be later updated in the Register of Members. This feature saves a lot of time and keeps Company’s Register of Members updated immediately after the Minutes of the meeting are finalized.
Steps to get auto filled Register of Members
- Update the capital structure segment in the Financial Information module under Company Data
- Create the agenda for the meeting in which Allotment of shares is to be approved by the Board
- Add ‘Allotment of Shares’ agenda item to the agenda
- Click on the icon available in the agenda item for Allotment of Shares available to enter the allotment details
- Enter all the Allotment Details and click ‘Save’
Please Note: Allotment details updated in the icon can also be copied to the resolution. Go to Allotment of Shares Resolution and place the cursor where you want to copy the table with allotment details. Click on the icon again and click ‘copy’ button to copy the allotment details. - Save the Agenda and update Meeting Details
- Click ‘Final’ button to finalize the Agenda. Once the Agenda is finalized allotment entries in the Register of Members will be available in draft mode.
- After finalizing the Minutes of the Meeting, go to Register of Members and finalize the allotment entry by clicking the final button
BLISS enables users to print or download a fully complete Share Certificate for each shareholder in an allotment based on data entered in the Register of Members. This feature enhances the productivity of the Secretarial team and reduces their effort.
How to Print Share Certificate
- Please ensure details of the allotment for all the shareholders in an allotment is updated in the Register of Members.
- Click on Register of Members and select the folio of the shareholder for whom you wish to print the share certificate.
- Identify the allotment entry for which you want the share certificate to be printed.
- Click on the ‘Print Share Certificate’ icon and a fully complete Share Certificate will be downloaded for printing.
All the returns filed by the Company in the previous financial year to the year in which the company is registered in BLISS is available in the Company Master Data under the module Registers & Returns.
In addition to all the returns filed in the previous financial year being listed, the start date of the content in the Statutory Registers can also be updated for ready reference in the same screen.
Both these details help in conducting any audit-statutory or secretarial and due diligence by any investor or potential investor in the company.
Know Status of Returns filed by the Company in the previous financial year
-
- Go to Company Data, click on Registers & Returns
- Returns filed with MCA for the Previous Financial Year prior to BLISS subscription will be auto populated from the MCA data and shown for your easy review
Steps to update status of Statutory Registers maintained in/outside BLISS
- Go to Company Data, click on Registers & Returns
- Update the status as ‘Y’ for the Registers which are maintained outside BLISS for the period prior to BLISS registration
- For Registers marked Y, the up to date is a mandatory, enter the date up to which the Register is maintained outside BLISS.
- Click Save
In BLISS repetitive data entry is eliminated as a user can copy the details in Part – A of the Register of members or the Register of Directors and KMP of a folio from one company to another within the User’s portfolio.
How to do this:
- Click on the Company from which the register entry is to be copied.
- Click on register tab and select the required register (i.e., Register of Members or Register of Director and KMP)
- Click on the particular folio that is to be copied
- Click on copy button on top right-hand side
- Type the company name to which the entry is to be copied
- Click on Paste button
- The desired entry is copied in a new folio.
Maintain all your 14, yes fourteen statutory registers electronically in BLISS as per the formats prescribed in the Companies Act, 2013.
- After the resolutions are passed, you can update the Registers by clicking the ‘Add’ button and enter the specific entries one by one.
- For past transactions, BLISS provides an excel template to upload all entries into the electronic register in one step.
With updated registers, BLISS will automatically
- Capture the names of all the Directors and Members for the meetings scheduled-Board Meeting, Committee Meetings and Shareholders Meeting.
- Have the annual return form MGT-7, automatically filled with all the required details.
Save your time and efforts with BLISS and access it 24 by 7, from any internet connected laptop or desktop.
Action Trackers
- Go to Action Trackers Tab and click on the particular action under Event based Action Tracker
- Select the user to whom you wish to assign the task
- Update comments or upload any attachment if required and click ‘Submit’
- Under Action Tracker Tab, go to Calendar based Action Tracker
- List of pending actions with due dates will be available
- Once the activity is done, necessary documents can be uploaded for records
- Confirm it to ‘Yes’ and click ‘Submit’
- Confirmed actions will be available in Records page.
Further, the user can also add their own actions in the system like Debenture Interest Payment dates, renewal of license, Power of Attorney and the like.
How to create custom Calendar Based Trackers in BLISS
- Click on ‘Add’ button in the ‘Action Trackers-Calendar Based’ screen.
- Enter the title of the tracker and choose whether the activity is a One-time or a recurring activity and set the due date for completion. Based on the chosen recurrence frequency (Weekly/Monthly/Quarterly/Half-Yearly/Yearly), the activity will get triggered automatically.
- Users can also set the ‘Stop Recurrence’ for the automated recurring activities in case they should be disabled after a specified cut-off date.
- For each of these custom calendar trackers, users can assign a ‘Responder, who will be notified of such task assignment along with the due date via email and an ‘Approver’.
- The responder can upload the required proof for evidence of action completed for future reference and mark the status as ‘Complete’ to notify the Approver of the completion of the task.
- Approver can review and close the action on completion or re-assign, if required.
- Completed actions are automatically moved to Records Page for future reference, which can also be made available for viewing to the auditors/due diligence team.
- BLISS triggers the pre and post meeting events along with the due dates for the agenda and minutes prepared using BLISS
- The actions triggered can be assigned or delegated to other users
- Provision for the assignee to update the status of completion for the assigned task
- Assignee can also upload the proof of completion and enter the date of completion for the completed task
- Provision to select multiple approvers who also get an e-mail intimation once the assignee marks status of the action as complete
- Approvers can approve the completed action or can reassign the same
- Users authorized to receive reminders in the ‘Reminder Status’ of the User Rights also get email reminder for the due date
- Provision to create customised event-based actions
- Search based on filters- on the basis of due date, meeting date or assignee for easy tracking and planning of the activities falling due
Key features of the Calendar-based Action Tracker in BLISS
- BLISS triggers all the calendar-based compliances along with the due dates, 30 days prior to the due date.
- Users authorized to receive reminders in the ‘Reminder Status’ of the User Rights get email alerts for the action.
- Users can upload the required proof for evidence of action completed for future reference.
- Users can confirm and close the action on completion.
- Completed actions are automatically moved to Records Page.
- Users can search based on the filter of due date for easy tracking and planning of activities falling due.
BLISS enables users to stay prepared and plan for all event-based and calendar-based actions and compliances with BLISS Action Tracker. Users who are authorized to receive reminders in the ‘Reminder Status’ of the User Rights will get email reminder for the due date.
- For Event-based actions, based on agenda items that are part of your Meeting Agenda, BLISS will automatically trigger the list of pending action to be done along with their due dates. These actions can be assigned or delegated to other users.
- Once the agenda of the meeting is finalised, pending actions get triggered and can be seen under the Action Trackers Tab
- Go to Action Trackers Tab and click on the particular action under Event based Action Tracker
- Select the user to whom you wish to assign the task
- Update comments or upload any attachment if required and click ‘Submit’
The user to whom the task is assigned, will get a mail intimation for the assigned task. On completion of the job assigned, status can be updated. Assignor can review the work delegated and approve it or reassign it. Approved actions will be available in Records page.
- For Calendar-based actions, BLISS triggers the annual compliances set by the users once, 30 days before the due date, every year.
- Under Action Tracker Tab, go to Calendar based Action Tracker
- List of pending actions with due dates will be available
- Once the activity is done, necessary documents can be uploaded for records
- Confirm it to ‘Yes’ and click ‘Submit’
Confirmed actions will be available in Records page.
Customised Event based and Calendar based actions can also be added by the users for a better work-flow management.
Stay prepared and plan in advance for your annual compliances with our calendar-based compliance tracker such as filing of form INC 22A ACTIVE (Active Company Tagging Identities and Verification) before 25th April and DIR 3 KYC (for directors who has been allotted a DIN on or before 31st of March 2019) before 30th April.
- Track calendar-based compliances or Add your compliance timelines once a year in the calendar-based events by using BLISS Action Tracker.
- You will get email reminders on the dates scheduled.
- You can identify the individuals who should get the reminders.
- On completion of the activity update status.
- Add as many activities as you need.
- Get a snapshot of the pending due dates at any point of time.
In BLISS, the Admin of the company and the assignor of any actions can at any time send a reminder mails to assignee reminding them to complete the pending actions on schedule.
How to send reminder mails for pending actions:
- Click on the Company that has the pending action for which you want to send the reminder mail
- Click on Action Trackers tab.
- Identify the pending action for which you want to send the reminder. Please ensure that the action is assigned to one of the users.
- Click on the pending action for which reminder is to be sent.
- Click on send mail now icon at the bottom of the screen.
- A reminder will be sent to the assignee of that action.
Please note Only Admin and Assignor of the action can send the reminders to the Assignee.
Compliance
Once the Agenda is created or a Circular Resolution is created in BLISS, all the related Registers, Returns and other actions to be updated gets triggered as pending activities along with their due dates.
Any changes made to the Meeting date in the Agenda or the Approval date in Circular Resolution automatically updates all the connected due dates for the related Registers, Returns and Actions that were triggered as pending activities.
Users with reminder status marked as ‘Yes’ gets reminder alerts for these activities. All the pending registers can be updated in BLISS itself and for returns, once the return is filed with MCA, the filed return along with the challan and SRN can be stored in BLISS for records.
How to track and update the Pending Registers triggered in BLISS?
1. Login to BLISS and go to your Company
2. Navigate to ‘Registers’ tab
3. Under the ‘Registers’ tab list of pending registers based on the agenda items are available along with due dates
4. Click on the register to update the details and save it.
How to track and upload Returns triggered in BLISS?
1. Login to BLISS and go to your Company
2. Navigate to ‘Returns’ tab
3. Under the ‘Returns’ tab list of pending returns based on the agenda items are available along with due dates
4. Click on the return and download the form using the available URL.
5. Upload the filed return along with challan and update SRN and other details
6. Click ‘Y’ to confirm and click ‘Submit’
How to track and update other Actions?
1. Login to BLISS and go to your Company
2. Navigate to ‘Action Tracker’ tab
3. On the left hand side, all the pending event based ‘Actions’ based on the agenda items are available
4. Actions triggered can be assigned to other users. Click the particular action, select the user to whom you wish to assign the task
5. Update comments or upload any attachment if required and click ‘Submit’
6. The user to whom the task is assigned, will get a mail intimation for the assigned task. On completion of the job assigned, status can be updated. Assignor can review the work delegated and approve it or reassign it. Finalised ‘Registers’, ‘Returns’ and approved ‘Actions’ go away from pending list and form part of company records available in ‘Records’ page.
Please note: Agenda and Minutes of the meetings and Circular Resolutions should be created using BLISS in order to get triggers for pending registers, returns and actions to be updated.
BLISS enables users to view the Registers, Returns and Action Trackers along with their due dates that are connected with a particular agenda item while preparing the meeting agenda. This helps users to pre-plan on the actions and compliances required to be done in advance.
Further, BLISS now triggers the pending Registers, Returns and Action Trackers even when the Agenda or Minutes are in the draft stage.
How to view ‘Associated Compliances’?
1. Prepare your meeting agenda/minutes using BLISS
2. Add necessary agenda items
3. Save and update date, time and venue under Meeting Details
4. Go to the respective agenda item for which you wish to view associated registers, returns and action trackers
5. Click ‘Associated Compliances’ button to view list of associated compliances along with their due dates
Note: Make sure you update the meeting date to view the due dates for the ‘Associated Compliances’.
- Under Registers, click on- “Register of Contracts with related party and Contracts and Bodies etc. in which directors are interested” and click ‘Add’ button to fill in the details of Contract entered into with the Related Parties on an ongoing basis to keep the registers up to date.
- The User also has the option of uploading multiple entries at once by downloading the template in BLISS to make entries in an Excel sheet and upload the same in BLISS.
- Only users with Subscriber, Admin and Editor rights can finalize the entries made in the Registers.
- Prepare your meeting agenda/minutes using BLISS
- Add necessary agenda items
- Save and update date, time and venue under Meeting Details
- Go to the respective agenda item for which you wish to view associated registers, returns and action trackers
- Click ‘Associated Compliances’ button to view list of associated compliances along with their due dates
- Edit/add/delete Associated Compliances:
-
- Click ‘Edit’ button to modify the associated compliance
- Edit or delete already triggered compliances as required
- Click ‘Add’ button to add more compliances
- Private Placement proposal for the Board meeting,
- Approval for issue at Shareholders’ Meeting and
- Allotment of Shares at a subsequent Board Meeting
2. Auto filled allottee details in the data sheet provided with all these resolution by just entering the folio no. or PAN for the existing members from the Register of Members maintained in BLISS.
- PAS-4 (Private Placement Offer Cum Application Letter) and PAS-5 (Record of a Private Placement Offer to be kept by the Company) at Board Meeting and Shareholder Meeting stage and
- PAS-3 (Return of Allotment) post Allotment Meeting or Circular Resolution passing resolution on allotment of shares.
4. AOC-4 of last two years can be uploaded for prefilling the fields related to relevant year’s financial position in PAS-4.
- Upcoming or over-due meetings
- Filing of the pending returns
How to extend Dashboard due dates
- Under Company Data, go to ‘Dashboard Compliance’ Tab
- Click ‘Add’ button
- Select the Meeting Type and Record Type
- Select the Meeting Date to be extended and update the Revised Date
- Update comments, if any and click ‘Submit’ button
For Returns:
- Go to ‘Returns’ tab where the list of returns to be filed are triggered
- Identify the Return for which due date needs to be extended
- Click ‘pencil’ icon to update the changes
- Update the ‘Revised Date’ and add comments, if any
- Click ‘Submit’ button
- Login to your BLISS account and you will land on your portfolio screen
- Click ‘Generate MIS Report’ button available just below the ‘Buy CIN’ button
- Select the period for which you wish to generate the report
- Select the companies and the modules for which the report is required
- Click ‘Download as excel’ or ‘Download as pdf’ button as required
Please note that the users with Admin, Editor, Drafter and Viewer access are permitted to download the Compliance MIS report, while other users like Directors and Auditors with Customized Viewer right can get access to download these reports only if the dashboard setting is turned ON for them.
- Enter the key financial information in the Financial information module and save to compute size based compliances
- These are editable fields with ‘Save with Re-computation’ provision to track changes in the applicable compliances triggered
- All the size-based compliances numbering 9 (nine) for private limited company and 19 (nineteen) for public limited companies, mandated under the Companies Act, 2013 as applicable to the company will get triggered based on the paid up capital, turnover, net worth, net profit and other information entered
- The Dashboard of the company will reflect the compliance status for size based compliances. Amber for impending compliances, red for non-compliance and green where the compliance status is updated in the specified module with proof of compliance
- This helps at the time of audits -secretarial, internal and statutory or due diligences
- In subsequent years, it helps your successor to find the proof for compliance in the pre-designated place for it.
BLISS provides a Risk Management Dashboard through which users can track the compliance status of the companies registered in BLISS. It calculates companies’ compliance summary once every day which can be refreshed on need basis. The users get status and consolidated reminder mails whenever the dashboard status changes. Risk Management Dashboard is a boon for the users who have large group of companies in their portfolio.
- Once the user logs in to his account, he/she can access all the companies in his portfolio registered in BLISS;
- Risk Management Dashboard has different modules to track i.e. AG- Agenda, MN- Minutes, RG- Registers, RT- Returns and AT-Action Trackers;
- The dashboard is colour coded into Green, Amber and Red. Any of the module in Green states compliance is upto date, Amber is due date nearby and Red is timelines missed;
- For users with bigger portfolio, Companies with more of Red modules, followed by Amber will be available on top so that users can prioritise their work accordingly in order to avoid non-compliance;
- Select any company for the drill down view of the dashboard and track the pending or overdue activities.
Please note: The dashboard status gets automatically refreshed everyday at 9 am and can be further refreshed for the current compliance status by the users at any point of time.
BLISS helps you track all parameter based compliances, numbering 9 for private limited company and 19 for public limited companies, prescribed under the Companies Act, 2013 as applicable for your company on the basis of paid up capital, turnover, net worth, net profit and other information as provided by you under Company Data-Financial Information.
Example: Requirements to have a women director, independent director or XBRL filings of financial statements.
- Go to Financial Information in the Company Data segment and update
- Capital Structure of your company
- Principal Activity
- Details of Subsidiaries
- Financial Information
- Go to Company Data, in Company Data Compliances
- Track due dates for the compliances triggered and their compliance status
- Store proof of compliance
- Get email reminders for due dates
- Get a snapshot of the pending compliances on dashboard
BLISS user can enter DSC renewal dates for all the Directors and KMP whose names are maintained in the Register of Directors and KMP to get e-mail alerts for renewing their DSC. This feature ensures you will not be caught with an invalid DSC when a critical document requires to be signed.
How to Monitor DSC renewal
- In Company Data, go to Settings page
- Under Digital Signatures Validity, update the DSC expiry dates for all the KMPs
- Get mail alerts for the DSC renewal 30 days prior to the expiry date entered
Please note DSC validity column will display names of only those Directors and KMPs whose details are updated in the Register of Directors and KMPs.
BLISS ensures that you do not miss calling for a Board Meeting or a Shareholder meeting as required by the Companies Act, 2013. The Act requires four board meeting to be held every year and the gap between the meeting should not be more than 120 days and a shareholder meeting to be held within six months of the yearend. BLISS alerts you by sending a email reminder to you for conveying the board / shareholder meetings.
Further, you can also use BLISS to email the agenda notice to the directors and shareholders using BLISS. If the notice given for board meetings is less than seven days, BLISS highlights that this is a meeting called at shorter notice. Also, if you have prepared the notice earlier and are sending the email at a later date, BLISS will remind you if the date of your emailing is less than 7 days from the date of meeting. BLISS will ensure that you stay compliant under all circumstances.
Emailing an Agenda notice using BLISS:
- Create your meeting agenda using BLISS
- Save the agenda, update meeting details and finalize it
- Select the file type, pdf or word and mark the print options
- Click ‘Email’ button and add the mail ids of the people to whom you wish to mail the agenda
- Click ‘Send’ button
In case, the date of e-mail is less than 7 days from the date of meeting or the date of notice and the date of sending e-mail is different, BLISS indicate the users with an alert.
In BLISS, the Admin of the company can classify their company as a Start-up Company, thereby enabling exemptions provided by the Companies Act, 2013 specifically for Start-ups. Under Section 173(5) of the Companies Act, 2013 Start-Ups need to have only one Board Meeting in each half of the calendar year, in contrast with regular companies that need to have four board meetings in a year. At the end of the five year period, the start-up company will transition to regular compliances which is auto tracked based on the date of Incorporation of the Company.
How to classify a company as the Start-up Company:
- Click on the Company for which start-up company compliance is to be activated
- Click on Company Data tab
- Click on Edit button in the MCA Data page
- Tick the Box for Start-up company on the right-hand top of the page
- Click on Save button
- The company is now activated as a Start-up Company
Note: Please note Only Admin of the company can activate Start-up Company compliances.
BLISS alerts for important and significant events on the basis of information entered by the user, like:
- Tenure end of existing Statutory Auditor
- Tenure end of Directors
- Renewal for Digital Signature Certificates of the Company’s Authorised Signatories that includes Directors and KMPs
Update following details and get alerts for due date:
- Tenure end of existing Statutory Auditor: Go to Company Data, under MCA Data update name of the Statutory Auditor appointed and their tenure end date. Six months before the tenure end BLISS triggers an alert for taking appropriate action.
- Tenure end of Directors: For all the Directors of the company with fixed tenure, update the tenure end date in Register of Directors and KMP and get alerts six months prior to take appropriate action.
- Renewal for Digital Signature Certificates of the Company’s Directors and KMPs: Go to Company Data, Settings and update DSC expiry dates for all the Directors and KMPs. 30 days before the expiry date BLISS reminds the users to renew the digital signatures.
BLISS helps you track all parameter based compliances, numbering 9 for private limited company and 19 for public limited companies, prescribed under the Companies Act, 2013 as applicable for your company on the basis of paid up capital, turnover, net worth, net profit and other information as provided by you under Company Data-Financial Information.
Example: Requirements to have a women director, independent director or XBRL filings of financial statements.
- Go to Financial Information in the Company Data segment and update
- Capital Structure of your company
- Principal Activity
- Details of Subsidiaries
- Financial Information
- Go to Company Data, in Company Data Compliances
- Track due dates for the compliances triggered and their compliance status
- Store proof of compliance
- Get email reminders for due dates
- Get a snapshot of the pending compliances on dashboard
Reminders reduces shocks and enhances productivity. BLISS make sure that you are not caught unaware at the last minute by providing you timely alerts to your email id registered with BLISS that is automated and system generated.
- BLISS has a real time dashboard with colour coded compliance status for all the meetings-Board Meetings, Sub-committee Meetings and Shareholders Meetings, Registers and Returns, Pending actions and calendar events and Other parameters based compliances.
- Alerts triggered based on change in status of dashboard for:
- Scheduling meetings- Board Meeting, Committee Meeting and Shareholders Meeting
- Finalizing minutes for all the meetings
- Updating Registers and filling Returns
- Completing assigned actions
- Completing compliance triggered by financial parameter
- Your admin can turn-on or turn-off the reminder status for any user based on their specific need.
Other functionalities
- CimplyFive’s Model Policy for dealing with Related Party Transactions
- CimplyFive’s Model Policy on Disclosure of Materiality of Events
- CimplyFive’s Model Policy on Diversity of Board of Directors
- CimplyFive’s Model Policy on Dividend Distribution
- CimplyFive’s Model Policy on Risk Management
- CimplyFive’s Model Policy on Succession Plan
- CimplyFive’s Model Policy on Vigil Mechanism and Whistleblowers
- CimplyFive’s Policy on Remuneration for Listed Companies
- CimplyFive’s Model Policy on Preservation of Documents and Archival
- Board Vault: Access Board documents for the upcoming Meetings on your Mobile Phone or Tab – both Android and iOS, organized into different meeting categories – Board Meetings, Sub-committee Meetings and General Meetings
- Annotations: Provision for Directors and Invitees to highlight and comment. The comments can be saved as personal notes or can be shared with the secretarial team
- Meeting records of previous meetings: Access records for the meetings held in last one year
- Voting: Voting on Circular Resolutions using the App and keeping the track of the votes cast on such Circular Resolutions.
- Calendar of the Meetings: A ready calendar that highlights all the Meetings, scheduled, and proposed, with ability to access the records by clicking on the Calendar. Get notifications on the App when a Meeting Document is available for review.
- Confirm availability for the Meeting scheduled: Confirm their availability for the scheduled meeting through the app and it sends intimation of the same to the secretarial team.
- Offline Mode: Provides seamless experience in reading the Board documents even when there is low connectivity or no connectivity.
- Go to Action Tracker tab to create new activities.
- Click ‘Add Activity’ button
- Update title and select the Responder. Names of the with BLISSGLOBAL access will be available under Responders’ list. However, the activities can also be assigned to other users by updating their name and email id
- Select if it is a one time or a recurring activity
- Update due date and select Approver from the Approvers’ list
- Click ‘Submit’ button to save
- On submitting the activity, Responder gets a mail intimation
- On completion of the activity, the Responder can update the status and the Approver gets a mail intimation to review the completed activity
- Further the Approver can approve and close the completed activity or can reassign the same.
BLISS provides you with the facility to customize your email signature so that the emails sent using BLISS will contain the signatory details such as name, designation, company logo and other details as uploaded by the user. The signature of Company Secretary or Convening Authority can be uploaded under the ‘Settings’ page once and the user sending the mail can choose to use or delete the signature for e-mails to be sent by them.
This will eliminate the effort and time required to type the signatory details every time one sends email using BLISS.
How to upload the custom signature in BLISS:
- Navigate to Company Data-> Settings.
- Scroll down to locate the field ‘Çompany’s Email signature’.
- Download the Sample Signature word file and edit the content as per your requirement.
- Upload the saved file and click Submit’’.
- The uploaded signature will automatically appear in the email screen when the user sends Agenda/Minutes/Circular Resolution using email function in BLISS.
Screenshot:

Enhancement in Board Evaluation Survey Report – Admin/Editors can now email the Survey Report to the Authorized Person/s directly with the following flexible options:
- Survey Report can be either in Excel or PDF or both the formats
- The Report in PDF format can be either in Landscape or Portrait mode
|
||
|
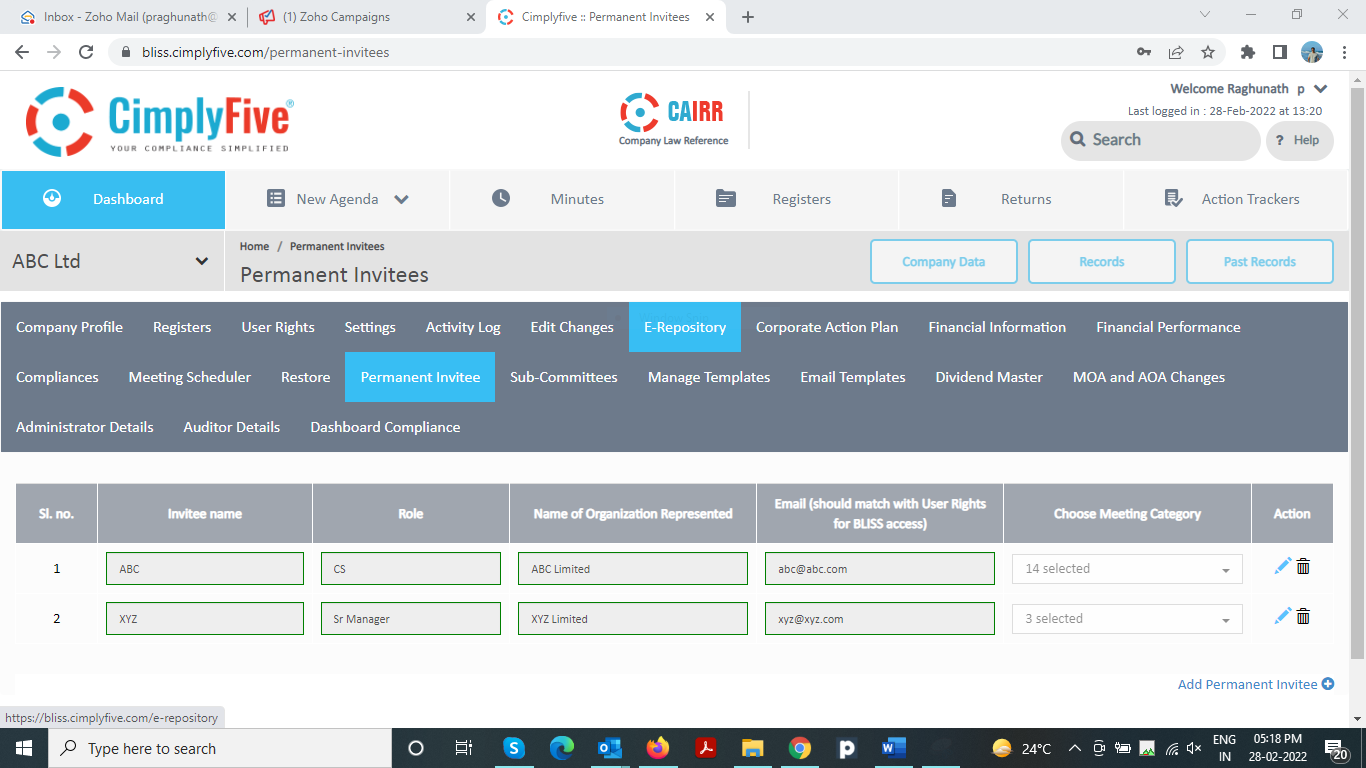
- Sub-committee Name
- Last meeting SL. No. to track serial numbers of subsequent meetings
- Select Members of the Committee from the list of Directors as available in Register of Directors and KMP updated in BLISS
- No. of Minimum Directors and Independent Directors for the purpose of Quorum
- No. of Meetings and Select the Quarter in which it is to be done in order to trigger the dashboard and due date reminder alerts
- Duration Start the date from which the sub-committee meeting needs to be conveyed and Duration End -the date up to which the sub-committee meeting needs to be conducted.
• Click Save button to save the details
CIMPLYBEST is a custom-built software for Board Evaluation crafted fusing the needs of Indian Corporate Law and Global Best Practices.
1. Custom built surveys for Indian Corporates viz Board, Chairperson, Sub-committees, Independent Directors & Executive Directors considering the requirements of SEBI Regulations.
2. Optimizes time management for the Board by autogenerating presentable reports – with graphs and tables, ready for use in board meetings.
3. Enhanced Productivity
· Prepopulated and editable surveys compliant with SEBI regulations
· Provision to clone already created surveys to other companies in the group
· Grouping of email ids based on the board and identified sub-committees for enabling single click circulation of the survey emails to the respective members
4. Ease of Use for responding Directors
· Cloud hosted and internet enabled for ensuring anywhere, anytime access
· Single-click operations: for ease of access, response and submitting survey response
· Single email sent consolidating all the surveys that a director needs to respond to
5. Provides confidentiality for Productive Board Evaluations
· Provision to sync survey links sent with the email ids of Directors to follow up with them for completion
· Delinks survey responses from the respondent on completion of survey
·Auto generates records required for Secretarial Audit without diluting the confidentiality requirements.
BLISS enables users to update details of Administrator and Compliance officer under “Administrator Details” tab under Company data. This feature helps to record the name and contact details of the Administrator (both internal and external) and Compliance officer of a Company in BLISS and this further helps the management in large group to have better control and knowledge on the person(s) responsible for Compliances of a particular Company in the Group.
Where to update the details?
1. Under Company data, click on- Administrator Details and click ‘Add’ button to fill in the details like name and contact details of the Internal Administrator, External Administrator and Compliance officer.
2. Only users with Subscriber, Admin and Editor rights can update this information.
BLISS enables user to update and track changes in Memorandum of Association (‘MOA’) and Articles of Association (‘AOA’) from the year of incorporation of the Company till date. This helps in creating an institutional memory on change in MOA and AOA and users can also upload a PDF or an excel file of the changes made. This helps large groups with multiple companies to keep track on the changes of MOA and AOA of all companies.
Where to update the Memorandum of Association changes
1. Under Company data, click on- MOA and AOA Changes and click ‘Add’ button under Company MOA to fill in the details of date of Change, Clause changed, Old and New Clause from the year of incorporation of the Company till date.
2. You can also upload relevant attachment in PDF/excel file of the changes made.
3. Only users with Subscriber, Admin and Editor rights can update this Master information.
Where to update the Articles of Association changes
1. Under Company data, click on- MOA and AOA Changes and click ‘Add’ button under Company AOA to fill in the details of date of Change, Old and New Clause from the year of incorporation of the Company till date.
2. You can also upload relevant attachment in PDF/excel file of the changes made.
3. Only users with Subscriber, Admin and Editor rights can update this Master information.
BLISS provides the facility for the user to update the details of Auditor-Statutory, Secretarial and Internal Auditors from the year of incorporation of the Company till date. This helps in creating an institutional memory along with the provision to download reports on Auditor details (i.e., Statutory Auditor, Secretarial Auditor, Internal Auditor and Cost Auditor) for a specific set of companies or the entire Group of Companies to which the user has access. This feature helps large groups with multiple companies to generate required information from BLISS thereby reducing their administrative load.
Where update the Auditor Database
- Under Company data, click on- Auditor details and click ‘Add’ button to fill in the details of appointment date, tenure, cessation date, fees paid etc. with respect to Statutory Auditor, Secretarial Auditor, Internal Auditor and Cost Auditors of the Company from the year of incorporation of the Company till date.
- You can also upload relevant attachments (in PDF) such as – e-Form(s) filed with MCA, consent letter from the auditor or appointment letter for the auditor for future reference.
- Only users with Subscriber, Admin and Editor rights can update this Master information.
How to Generate Reports
- Go to My Profile section on the top right of your screen and click ‘Report Generation’
- Select the type of report, say Internal Auditor master, Statutory Auditor Master, Secretarial Auditor Master and Cost Auditor Master from the list available on left side of the screen
- Click ‘Filter’ button to select the companies for which you wish to generate the report and select the desired fields from the super set of all fields.
- Click ‘Apply’ to apply the filter criteria.
- Click ‘Excel’ icon to download the excel report
Only users with Subscriber, Admin and Reporter rights can generate the reports
BLISS enables user to update the Dividend Master from the year of incorporation of the Company till date. This helps in creating an institutional memory and to download reports on Dividend for a specific set of companies or the entire Group of Companies to which the user has access. Only users with Subscriber, Admin and Reporter rights can generate the reports.
This helps large groups with multiple companies to generate required information from BLISS whereby they can reduce their administrative load.
Where to update the Dividend History
1. Under Company data, click on- Dividend Master and click ‘Add’ button to fill in the details of Dividend declared, including details of IEPF transfer dates from the year of incorporation of the Company till date.
2. You can also upload relevant attachments (in PDF) such as -Bank Statements, Shareholder Details.
3. Only users with Subscriber, Admin and Editor rights can update this Master information.
How to Generate Reports
1. Go to My Profile section on the top right of your screen and click ‘Report Generation’
2. Select Dividend Master from the list available on left side of the screen
3. Click ‘Filter’ button to select the companies for which you wish to generate the report and select the desired fields from the super set of all fields.
4. Click ‘Apply’ to apply the filter criteria.
5. Click ‘Excel’ icon to download the excel report
Only users with Subscriber, Admin and Reporter rights can generate the reports
- Login to BLISS and go to your company
- Click ‘Company Data’ button
- Under Company Data, go to ‘E-repository’ tab
- Get below mentioned updated model charters for the sub-committees:
-
- CimplyFive’s Model Audit Committee Charter Amended in September 2021
- CimplyFive’s Model Nomination and Remuneration Committee Charter Amended in September 2021
- CimplyFive’s Model Stakeholders Relationship Committee Charter Amended in September 2021
- CimplyFive’s Model Independent Directors Committee Charter Amended in September 2021
- Enter your mobile number under ‘My Profile’ – Go to ‘Welcome Section’ on top right of your screen and click ‘My Profile’ tab from the dropdown
- Users with Admin role can add the mobile number of the users in the User Rights tab by clicking edit icon, available under Company Data screen
- Users with Admin role can update the mobile number at the time of adding new users along with other details
- The Agenda, Minutes, Circular Resolutions and Extracts downloaded from BLISS reflects the CIN that is effective on the date of circulation of Agenda/ publish of Circular.
- Based on nature of company, as determined by its CIN, the financial parameter-based compliances are triggered.
- Compliances with respect to filing of returns like MGT-14 will also be applied based on the type of company as contained in the CIN.
- MGT-7 generated at the end of the year, will merge all the meeting details of the two different CIN numbers for the same company.
How to update CIN change in BLISS
- Go to the company whose CIN has been changed
- Click ‘Company Data’ and go to Company’s Profile
- Scroll down and click ‘Edit’ button
- Go the ‘CIN’ field on top left of the screen
- Click ‘+’ button to add new CIN
- Update the effective date of CIN change and the new CIN
- Scroll down and click ‘Save’
a. Net worthb. Turnoverc. Net profitd. Previous year CSR Spendse. Details of Multi – Year Projectsf. Current Year Estimated Spends
4. Identify the CSR obligation and Compliances applicable to your Company as pre-populated under the sheets “CSR Obligation Quantified” and “CSR Compliance Checklist”. The key compliances populated are:
a. CSR Applicabilityb. Amount Available for Set-Offc. Deductions available as Administrative Overheads & Impact Assessmentd. Disclosures in Board Report as applicablee. Requirement of Impact Assessmentf. Forms & Documentation
- Go to Action Tracker tab to create new activities.
- Click ‘Add Activity’ button
- Update title and select the Responder. Names of the with BLISSGLOBAL access will be available under Responders’ list. However, the activities can also be assigned to other users by updating their name and email id
- Select if it is a one time or a recurring activity
- Update due date and select Approver from the Approvers’ list
- Click ‘Submit’ button to save
- On submitting the activity, Responder gets a mail intimation
- On completion of the activity, the Responder can update the status and the Approver gets a mail intimation to review the completed activity
- Further the Approver can approve and close the completed activity or can reassign the same.
User can monitor the status of the activities through the dashboard for number of Actions/Tasks that are scheduled, Critical and overdue along with graphical representation of the same.
- Go to Welcome dropdown on top right corner of your screen
- Click ‘Report Generation’ tab
- Click ‘Add User’ button available under ‘Users’ tab
- Update First name, Last name and Email id of the user
- Select the Companies for which you wish to give access to the Reporter
- Click ‘Submit’ button
- Customizable surveys for the Board, Chairperson, Sub-committees, Independent Directors & Executive Directors considering the requirements of SEBI Regulations.
- Ease of use:
-Prepopulated and editable surveys compliant with SEBI regulations-Provision to clone already created surveys to other companies in the group
- Grouping of email ids based on the board and identified sub-committees for enabling single click circulation of the survey emails to the respective members
3. Optimizes time management for the Board
- Autogenerated presentable reports –with graphs and tables, ready for use in board meetings
4. Ease of Use for responding Directors
- Cloud hosted and internet enabled for ensuring Anywhere, Anytime access
- Single-click operations: for ease of access, response and submitting survey response
- Single email sent consolidating all the surveys that a director needs to respond to
5. Provides confidentiality for Productive Board Evaluations
- Provision to sync survey links sent with the email ids of Directors to follow up with them for completion
- The link is disabled from the survey responses on completion of survey to ensure confidentiality
6. Tailor made for Indian Corporate law
- Auto generates records required for Secretarial Audit without diluting the confidentiality requirements
BLISSTAT is a cloud hosted software custom-built for Direct Tax Assessment Tracker with customisable e-repository and workflow for seeking approvals and delegating tasks.
- Pre-populated but customisable e-repository organized by Assessment Year with specific sections for Advance Tax, Tax Provisions, Income Tax Return, 143 (1) Assessments, 143(2) Assessments and Appeals organized by Assessment Year with specific sections for Advance Tax, Tax Provisions, Income Tax Return, 143 (1) Assessments, 143(2) Assessments and Appeals
- Prepopulated status for each section like
Advance Tax –Estimated, Approved, Paid
Income Tax Returns –Draft, Approved, File
143 (1) Assessment –Received, Accepted, Contested
- Workflow with email facility for seeking approvals and delegating tasks
- Provision to store documents with user defined tags
- Provision to search documents stored by tags, sections & Assessment Years
- Role based user rights, Activity logs and two-factor authentication
- In Company Data, go to User Rights
- Click ‘Add User’ button and update first name, last name and email ID of the new user
- Under Role, select ‘Director’
- Select the required filters for the type of records the Director is given access to
- Select the period for which records can be viewed by that user and whether the user has access to draft documents too.
- Set access validity end date and click ‘Submit’.
Go to the Sub-committee meeting agenda, where the User added as a Director of the Company is an invitee in the respective committee meeting. Update the details and email id of such Director as an invitee under Agenda Meeting Details.
- In Company Data, go to User Rights
- Click ‘Add User’ button and update first name, last name and email ID of the new user
- Under Role, select ‘Invitee’
- Select the required filters for the type of records the Invitee should be allowed to access
- Select the period for which records can be viewed by that user and select among drafts and final documents
- Set access validity end date and click ‘Submit’.
Go to sub-committee tab under Company Data and add name and email id of such user as a member of the respective sub-committee.
- In Company Data, go to User Rights
- Click ‘Add User’ button and update first name, last name and email ID of the new user
- Under Role, select ‘Invitee’
- Select the required filters for the type of records new user should be allowed to access
- Select the period for which records can be viewed by the Invitee
- Set access validity end date and click ‘Submit’.
Make sure details of the Invitee along with his/her mail id must be added in the meeting details of the respective meeting and the mail id entered in User Rights page should match with the mail id entered in the Meeting Details.
-
Daily updates: The site is updated every working day before 11 A.M. for all changes that have taken place on the previous day
-
Integrated view: All the Rules, Notifications, Orders, Circulars and Clarifications are integrated into the Act using hypertext providing a comprehensive view of the Act as it stands on any given day. Further there is inter-linkage between the Companies Act, 2013, SEBI Regulations and IB Code to provide seamless view of the law as is applicable for both the listed companies and unlisted companies.
-
Ease of Search: Search the entire act, rules and regulations with any keyword to find the relevant sections.
How to Access/ Use CAIRR
-
Access CAIRR on the web through https://ca2013.com/ or download CAIRR PLUS android app from Google Play store
-
Displayed on the home page is the date on which the site was updated along with the most recent notifications
-
You can click on ‘View Sections’ to see all the chapters of the Companies Act and select the section you wish to read
-
Get integrated view for all related Rules, Notifications, Orders and Clarifications along with the effective dates for all the sections
-
Mouse-over the hypertext for the definitions and integrated rule or notification for easy navigation
-
To access Insolvency and Bankruptcy Code or SEBI regulations, click on top right of the screen and click on the specific tab
-
You can search the entire site by using a key word in the search bar for all the relevant sections and regulations to be displayed in the search result
- Prepare your meeting agenda using BLISS
- For user-defined agenda template uploaded in BLISS, please make sure token for Video Conferencing i.e. |agAVLink| is added in the template
- Save your meeting agenda and update the Meeting Details
- Under Meeting Details, check Conference Available check box and update the Contact Number and Video Conference Meeting link
- The link provided will be added to the Board Docket
Circulate your Board Docket to the Directors using BLISS email facility. Users with BLISSDOCS subscription can give access of the Meeting Record to their Directors for paperless Board Meetings.
Please note– Link for the recorded meeting can be stored under Minutes Meeting details for future reference.
- Make sure you have registered login account in BLISS
- Login to your BLISS account
- Click ‘Help’ button available on top right of the home screen
- You will be directed to ‘BLISS Support’ portal
- Scroll down to ‘User Manual’
- Select the BLISS variant you have subscribed for, to download the User Manual for the same. i.e.:
i. BLISSii. BLISSPLUS or BLISSLISTEDiii. BLISSGLOBALiv. BLISSDOCS
- BLISS provides two factor security authentication by way of password secured login and an OTP received in the users registered email.
- BLISS permits users to reset their password at intervals beyond 90 days by unsubscribing to password reset reminders. By default, the user will get a reminder to change password after every 90 days for enhanced security
- IP Access Restriction– The Admin can restrict access of any BLISS user by making their IP Access limited to their office IP address
- Go to Company Data, and in company data to User Rights
- Identify the users for whom you wish to restrict the IP access
- Toggle the IP access key to turn off the access
- Define IP Range by adding the Start IP and the End IP
- Click Submit
BLISS provides a provision to upload excel files pertaining to Financial Performance and comparison with Business Plans or prior period business performance as practiced by the company. This enables the user with director right to view the same anytime they need to.
For users with Admin/ Editor role
Steps to upload Financial Performance:
- In Company Data, go to ‘Financial Performance’ tab
- Click ‘Add new section’ button
- Enter ‘Section Title’ and click ‘Done’
- Click on ‘Choose file’ to select excel file to be uploaded and click ‘Upload’ button
- Click ‘>’ button to view the uploaded file
Please note only excel files can be uploaded.
For users with Director access
Go to ‘Financial Performance’ tab and select the file for the preview. Click on the file link to view the same.
BLISS enable the users to add multiple fields to their company profile page, like Bank account details and their signatories and any other details of their choice. These rows can be added/edited only by the user with Admin Rights.
Steps to add user defined fields
- In Company Data, go to ‘Company Profile’
- Click ‘Edit’ button
- Adding Bank Details:
- Click ‘Add Bank Details’ button, update all the details and click ‘Save’.
- Click ‘Edit’ to modify the details and ‘Delete’ to delete the entire entry.
- Adding Other Details:
- Click ‘Add New Row’ button, enter the Row Title and select the type of row i.e. Text Box, Description Box, Date field or Number and Click ‘Add’
- Update the details in the new row added
- Click ‘Delete’ button to delete the rows
- Click ‘Save’ button at the end of the Company Profile page to save the details.
BLISS enables the Admin of a company to set the frequency at which they want to get reminder emails’ alerts for their pending and overdue activities for compliance. This feature enables the Admin to customize alerts to suit the needs of their company, as some companies may need more frequent alerts to stay compliant.
Steps to set user defined reminder email interval
- In Company Data, go to ‘Settings’ tab
- In the settings tab scroll down to the row ‘Mail Interval (in days)’ field
- Set the number of days, i.e. enter the number of intervals at which you would like to get reminders. For example, if you enter 1, you will get reminder every day and if you enter 7 you will get weekly reminders.
- Click ‘Submit’ button to save your input.
Please note, only users with Admin rights can set the email reminder interval.
Every Company registered in BLISS can now have multiple Admins with customized rights. This is to ensure that the password is not shared among multiple users where there is only one Admin. For multiple Admins added in BLISS, the first Admin can delegate any or all their rights to them. For e.g. Right to add/modify/remove users, Editing ‘Company Profile’ page, Update the ‘Registers & Returns’ master status, Change the ‘Activity Log’ status by shifting the toggle button from on to off or vice-versa, and take ‘Print all’ of records created in BLISS.
This feature reduces dependency on a single Admin for making routine changes like changing settings page and other formatting changes by delegating these to the secretarial team members.
Note: By default, every Admin added will have permission to edit ‘Settings’ page of the Company.
How to Add Admins:
- Click on the Company in which you are admin and you want to add another user as Admin
- Click on ‘Company Data’ tab
- Click on ‘User Rights’ tab
- Click on ‘Add User’ button on the bottom right of the page
- Enter First Name, Last Name and E-Mail id of the user and select the role as admin
- Customize the Admin access right by toggling the buttons indicating the feature for a particular right
- Click on ‘Submit’ button on the bottom right of the page.
Please note that, the role of an existing user can also be changed to Admin role by, clicking on ‘Roles’ field corresponding to the name of the user whose role is to be changed to Admin, then customizing the rights and clicking on ‘Submit’ button.
In BLISS, the Admin of the company and the assignor of any actions can at any time send a reminder mails to assignee reminding them to complete the pending actions on schedule.
How to send reminder mails for pending actions:
- Click on the Company that has the pending action for which you want to send the reminder mail
- Click on Action Trackers tab.
- Identify the pending action for which you want to send the reminder. Please ensure that the action is assigned to one of the users.
- Click on the pending action for which reminder is to be sent.
- Click on send mail now icon at the bottom of the screen.
- A reminder will be sent to the assignee of that action.
Please note Only Admin and Assignor of the action can send the reminders to the Assignee.
BLISSGLOBAL is a BLISS variant which is used for foreign company and LLPs. The users can-
- store all critical data of the company including shareholders, directors, auditors and lawyers,
- create an e-repository for all its critical records including secretarial, labour and taxation related records, and
- track calendar-based compliance actions for their foreign companies and LLPs registered in BLISSGLOBAL to track compliances.
- Subscribe and register your foreign company or LLP in BLISS Global.
- Create the company profile by updating all the important master details including details of the Directors and Shareholders.
- Add up to 20 users to whom you wish to give access to company’s record with different roles like editor, drafter, viewer.
- Create User defined sections and upload company’s record financial year wise in their respective sections.
- Create tasks under Action Trackers, assign it and track compliances.
- Monitor the Compliance status through the dashboard for number of Actions/Tasks that are Scheduled, Critical and Overdue along with graphical representation of the compliance.
BLISS provides a Corporate Action module that helps users in planning and scheduling corporate actions like Bonus Issue, Private Placement, Conveying Extraordinary General Meeting from the secretarial perspective. This feature makes BLISS more comprehensive.
How to use Corporate Action Plans in BLISS
- Go to Company Data and click ‘Corporate Action Plan’ tab
- List of Corporate Action Plans are available for the user to download
- Search the desired Corporate Action Plan and download the same
- In the excel downloaded, you have a check list that ascertains the eligibility for conducting the corporate action contemplated.
- After ascertaining eligibility, update the start activity date in the Timeline sheet. Based on the date updated by the user, it generates the schedule for the mandated compliances
BLISS auto fills Company Master Data and Company’s Profile is created automatically. On the basis of CIN updated at the time of registration of a company in BLISS, it verifies the publicly available information from MCA and auto fills the Company Master Data.
How to get auto-filled Company Profile
- Once CIN credits are purchased, user can register the Company in BLISS
- Select the type of Company- Listed or Unlisted and update CIN of the Company
- Click ‘Verify’ button
- Company Master Data gets auto-filled
- Update other Company details and click ‘Save’
BLISS allows Admin of the company to update the Registered Office address in the Company master consequent to a change in the registered office along with an effective date. Based on the date of change, for all documents generated by the system prior to that date, the earlier registered office will be printed and for documents dated after it, the new registered office will be printed.
How to update the new name of your company
- Click on the Company for which new name is to be updated
- Click on company data tab
- Click on Edit button in the right-hand bottom of company profile page
- Click on the “+” icon appearing in the Registered Office field
- Click on edit icon to enter the effective date and new Registered Office address of the company and click on save icon to capture the changes made
- Click on save at the end of the page to ensure that the change gets effected for all documents generated in the software.
Please Note: Only Admin can update the new Registered Office in the company profile.
BLISS provides you with the feature to capture the date and time stamp for all your secretarial records and make it compliant for Maintaining Electronic Records under the Companies Act, 2013. To enable this feature, the Admin of the company should turn the Activity Log on. When the Activity Log is turned on, all the activities in BLISS get date and time stamped in the Activity Log Screen, to enable easy tracking.
- Only the user who has Admin rights of the Company has the right to turn the Activity log Off or On
- Default settings for all companies is ‘Off’
- When the Activity Log is ‘On’ all the activities in BLISS will be time stamped.
How to keep track of the secretarial activities of a Company using Activity Log
- Go to Company Data, click on Activity Log
- Admin should set Activity log to “ON” in order to time stamp activities in BLISS
- Details of all the activities, name of the users along with date and time of the activities will be available
BLISS has an easy method to transfer admin controls to facilitate change in roles within the organization or to accommodate an existing member separating from the organization. This reduces dependency on individuals as their role can be transferred to another in an instance.
Transfer of Admin Rights to Existing User
- Go to Company Data and in Company Data, User Rights
- Go to the specific user to whom you want to transfer admin rights and click on the ‘Role’ and select the ‘Admin’ option from the drop-down menu.
- Click ‘Submit’ to make the change
Transfer of Admin Rights to New User
- Go to Company Data and in Company Data, User Rights
- Click ‘Add user’ and enter user’s details -i.e. users first name, last name and email id
- Assign a role to the user- Editor/Drafter/Viewer and click ‘Submit’
- Ask the new user to log-in and become a user in BLISS
- After the new user has logged in, you can transfer Admin Rights to the new user added as detailed in the process for transferring Admin Rights to Existing Rights.
Please note: There can be only one Admin for a Company. When Admin rights are transferred, the Admin transferring their rights becomes a Viewer for that company. The new Admin can remove the old Admin as a view if they so desire.
BLISS places enhanced security in your hands. Being a cloud-based software that is anywhere anytime accessible, you now have the option of ensuring who has the right to this anywhere access and who does not. You can now restrict junior members of your staff from accessing records created or stored in BLISS only in your office and prevent them for accessing the software from outside your office. IP Access is the feature that lets you achieve this by restricting access of any BLISS user by making their IP Access Restricted to only your office IP address. For other senior members of your team, BLISS is accessible anywhere, anytime and from any IP device as long as they use their password and OTP.
How to restrict IP Access
- Go to Company Data, and in company date to User Rights
- Identify the users for whom you wish to restrict the IP access
- Toggle the IP access key to turn off the access
- Define IP Range by adding the Start IP and the End IP
- Click Submit
Please note only the Admin has the right to Restrict IP access or remove the IP access restriction. If a user is restricted, then the user gets restricted to all other companies in his/her portfolio as well.
In BLISS, the Admin of the company may update the new name of the company once RoC approves it. This enables the user to generate documents that contains the new name and the former name of the company for all records created for a period of two years from the effective date of name change, as required by the Companies Act, 2013.
How to update the new name of your company:
- Click on the Company for which new name is to be updated
- Click on company data tab
- Click on Edit button in the right-hand bottom of company profile page
- Click on the “+” icon appearing in the company name field
- Click on pencil icon to enter the effective date and new name of the company
- Click on right tick icon to save the entry
- Close the pop-up window
- Click on Save button in the right-hand bottom of company profile page.
Note: Please note only Admin can update the new name in the company profile.
BLISS Users has individual login, and they can set their own password. The rights of the Users are company specific and they are classified into five categories –Admin, Editor, Drafter, Viewer and Director.
Hence for instance, a User can be an Admin for one company, an Editor in another and a Viewer in the third company with a common login thereby providing a single sign-on for multiple companies with different rights.
Categories of Users
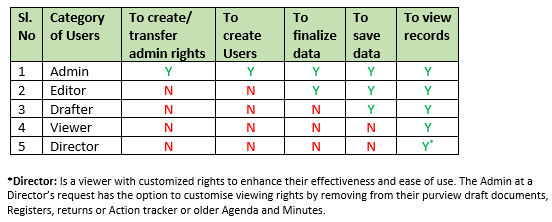
Reminders
The Admin can set reminder status for users. Users with reminder status ‘Yes’ will receive all reminders and due date alerts from BLISS.